An Organization is the top-level unit of GrapheneDB and is the main unit under which Environments, Members and API clients are managed, along with the Notification preferences. Important to know is that billing happens at the Organization level. You can find detailed information on Billing in this article.
You’ll be able to have visibility into billing usage in each Environment within the Organization. This is also a place where new Organizations can be created, and where you can get invited to join an existing one.
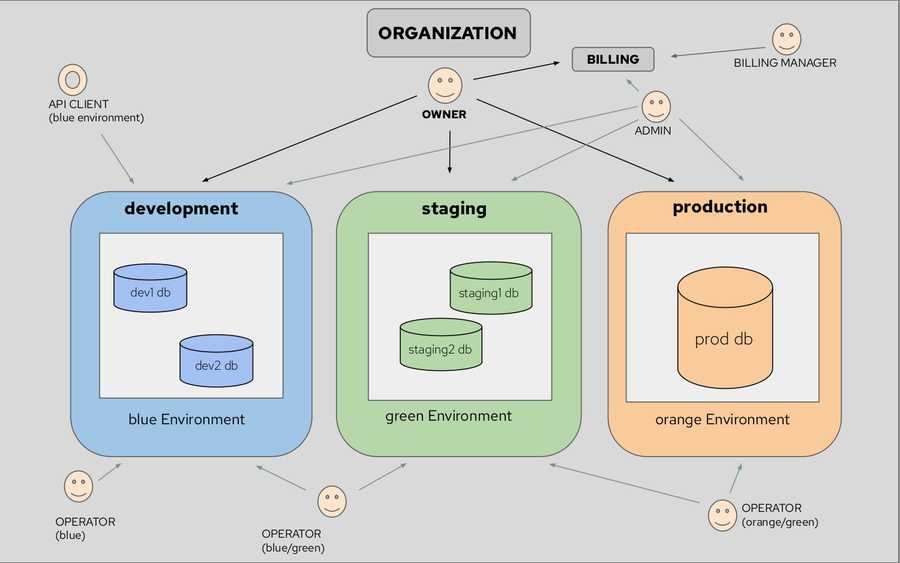
Below is the representation diagram of the potential Organization structure. It includes 1 Organization, 3 Environments (development, staging, and production), 5 databases, and a total of 6 Organization members (Owner, Admin, three Operators, and Billing Manager) + 1 API Client.
Of course, you can also have a single Environment and deploy all your databases into one Environment.
Creating an Organization
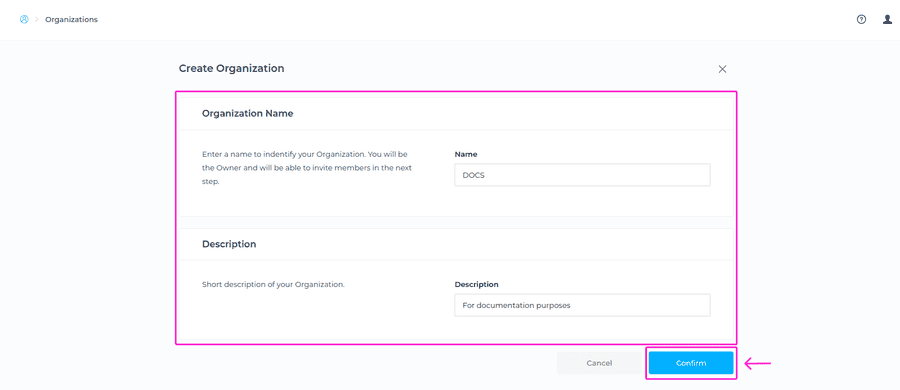
When you create an Organization, and choose a Support Plan, you are added as an Organization Owner. To create an Organization, click on Account icon > Organizations from dropdown menu > +Create Organization button.
In the next step, you will need to enter a name and description for that Organization. Click on Confirm button.
ℹ️ Info
When naming the Organization these conditions must be met:
- At least two characters long.
- At most thirty characters long.
- Can only contain alphabetical characters, numbers, underscore or dashes.
Now, you’ll be prompted to add a credit card details and billing details. Once that info is added, you will be prompted to select a Support Plan. Currently we offer two Support Plans, Standard (FREE) and Gold ($50/month), and we plan to add additional options in the future.
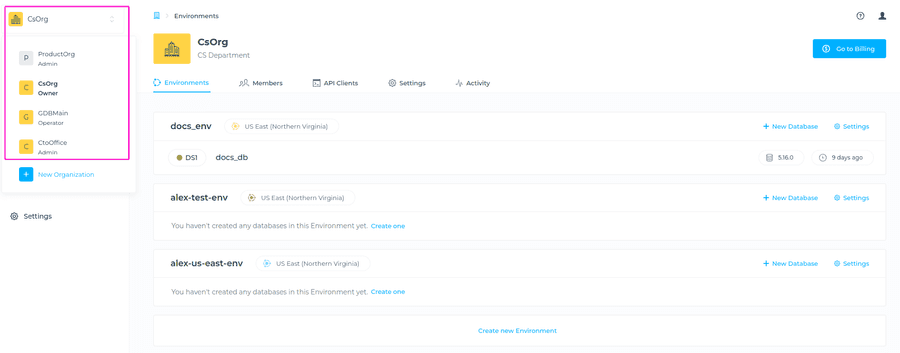
If you already have an Organization or multiple Organizations created, you can switch between them by clicking on your Organization name and selecting a desired Organization from the drop-down menu, or create a new one.
Inviting a user to an existing Organization
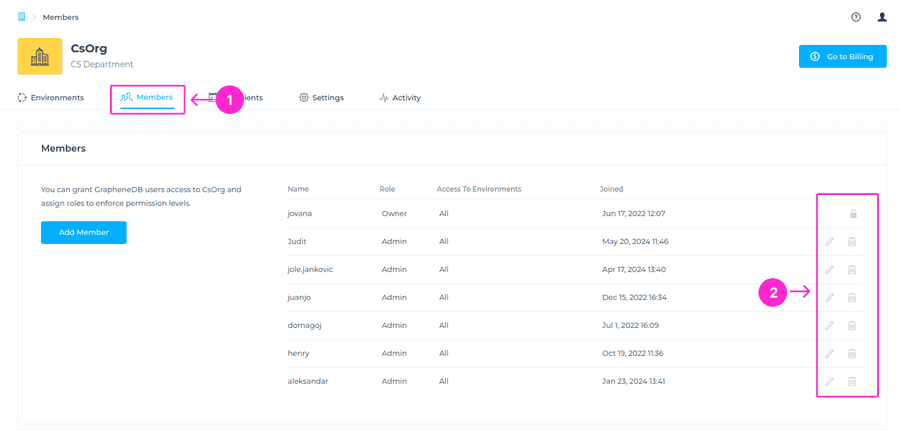
A GrapheneDB user is a person with the GrapheneDB account which can then become a member of the Organization. To invite other members to your Organization, please navigate to the Organization where you want them invited to, and click on Members tab > Invite User. You can grant GrapheneDB users access to your Organization and assign roles to enforce permission levels.
After clicking on Invite User, you’ll be prompted to provide the email address of the user you are inviting, Role that you are giving to them, and access to the Environment you are allowing.
If the member you want to invite does not already have a GrapheneDB account, they’ll need to create it first by following these steps here.
ℹ️ Available Roles
Owner - has access to Billing, Members, Environments.
Admin - has access to Billing, Members, Environments.
Operator - has access only to assigned Environments. Read-only operator - has read access only to assigned Environments. Billing Manager - has access to Billing.
Managing members of your Organization
You can manage the members of your organization by navigating to the Members tab within the Organization. You can remove the user or edit the Role for the selected user. Please follow this article for detailed information on managing members.
Pending invitations
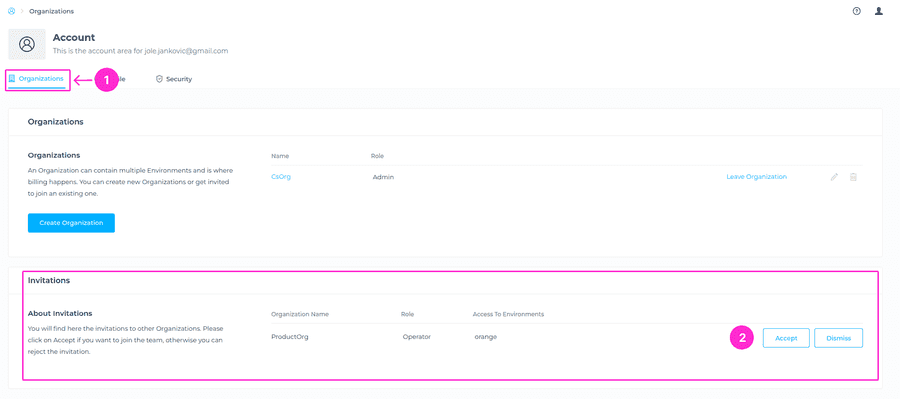
You can be invited to be a member of the same Organization or a member of a different Organization. Invitations expire automatically after 1 week.
When you’re invited to the Organization, you’ll be prompted to the modal window where you’ll see the organization info you’re invited to, Role you’re assigned to and permissions you’ll have. You can either Accept invitation or proceed to View pending invitations. To accept the invitation, please click on Accept invitation button.
If you choose to view pending invitations, you’ll be prompted to the Pending invitations section in the Members area, where you can choose to Accept or Dismiss the invitation. You can also see the Pending invitations table by going to your Account settings > Organizations tab.
Create an Environment
In GrapheneDB, all databases are deployed into Environments. Environments provide a way to group databases and configure the same network access rules (IP Whitelist, VPC peering), as well as configure access to a group of members of the Organization. For further info on how to create and manage Environments, please follow this article.
API Clients
GrapheneDB API Clients is a powerful tool that enhances the capabilities of developers and organizations in managing their database infrastructure. By providing secure, scalable, and efficient access to the GrapheneDB API, it facilitates better resource management, improves operational efficiency, and supports modern development practices.
Authentication for accessing the GrapheneDB API is managed through the OAuth 2.0 Client Credentials Flow. This method ensures secure and reliable authentication by using the following key components: API Client ID and API Client Secret. In the context of OAuth 2.0, the term API Client refers to the client application belonging to an Organization. This client application must have a role assigned (e.g., Operator role with assigned color of the Environment/s it has access to). This role assignment is a critical requirement for utilizing the public API.
With GrapheneDB API, you can automate deployment related operations, some of them being Create a Database, Pause/Resume database and schedule a Snapshot. Please note that with our API you can achieve all operations available to Operator Role. More information on this topic can be found here.
Notifications
We’ve created a Notification system related to visibility around your Organization such as database restart, database pausing, invitations to the Organization, and more which allows you to be aware of all the activities related to deployments within the Organization without the need to go directly into the Organization, Environment or Database Activity in the Console.
Owner View
In the Organization Notifications section, you can manage the email notifications that you wish to receive. You can choose to receive All notifications or Only critical notifications. By default, Notifications are disabled.
Admin View
In the Organization Notifications section, you can manage the email notifications that you wish to receive. You can choose to receive All notifications or Only critical notifications. By default, Notifications are disabled.
Operator View
In the Organization Notifications section, you can manage the email notifications that you wish to receive. You can choose to receive All notifications or Only critical notifications. By default, Notifications are disabled.
For more details about Notifications, please follow this article.
Switching Organization
If you’re a member of more than one Organization, you can easily navigate between them. Click on your Organization name on the left side, and choose a different Organization from the dropdown menu.
Transfer Ownership
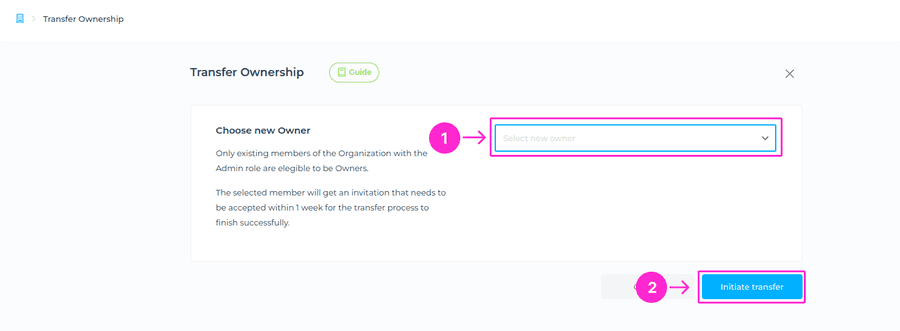
Only the Owner can transfer the Organization at any time to another member of GrapheneDB. Only existing members of the Organization with the Admin role are eligible to be Owners.
The selected member will get an invitation that needs to be accepted within 1 week for the transfer process to finish successfully.
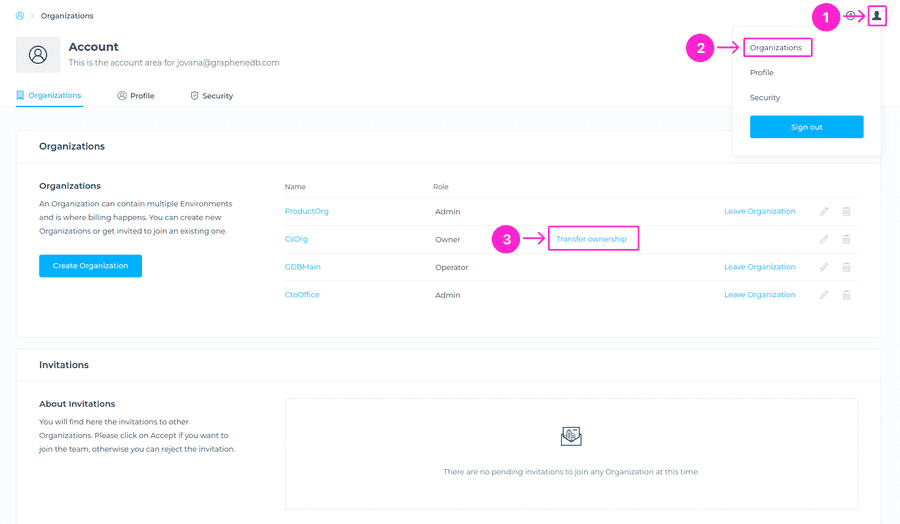
To Transfer Ownership, please navigate to the Account > Organizations from dropdown menu > click on the Transfer Ownership button.
A new window will show, where you can select the member you’d want to transfer ownership to. If there are multiple Admins, you will have a drop-down list of all Admin members, and you can select the one you want. Once the member is selected, please click on the Initiate transfer button.
After selecting a member we will send email with further info needs to be accepted for the process to finish successfully. If the request gets accepted your role will change to Admin.
On ownership transfer, the New Owner (previous Admin) keeps his notification preferences. More on notifications can be found here.
Deleting an Organization
The following requirements must be met to successfully delete an Organization:
- Only the Owner can delete the Organization.
- All deployments within the Environments must be deleted.
- All Environments within the Organization must be deleted first.
- There should be no pending invoices.
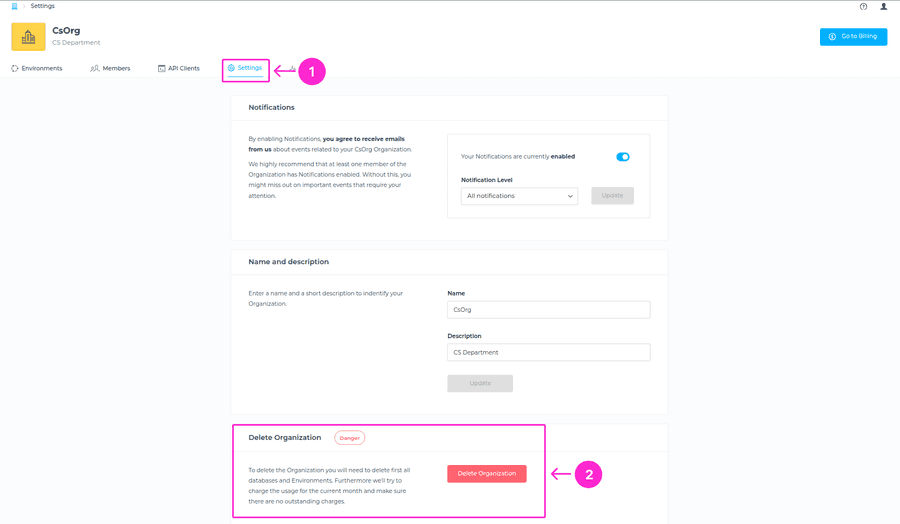
To delete an already created Organization, please navigate to the Account > Organizations from a dropdown menu > choose Organization > go to Settings tab
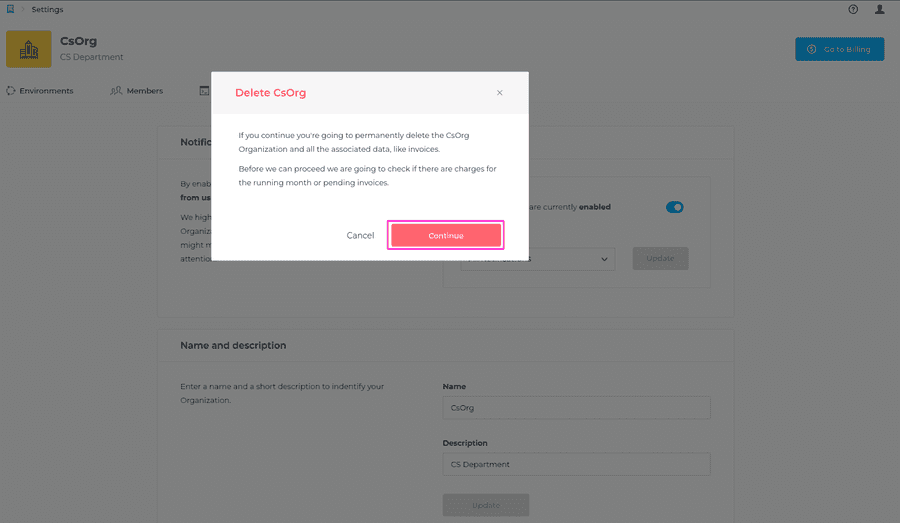
You’ll be prompted to the modal window to inform you that all associated data, like invoices, will be deleted once the Organization gets deleted. Considering the requirements mentioned earlier, we will check if there are any charges or pending invoices. Please click on Continue button to confirm that you’d like to continue with deletion.
If your Organization has pending charges or pending invoices, you’ll see a modal window to inform you that Organization is going to be marked for deletion after the final invoice is paid.
⚠️ Important
- If there is pending usage the Organization will change to a pending delete state and we’ll try to charge the pending usage.
- During this state your Organization will have a limited view where you can only access the Billing section to deal with the invoices.
- Once charged we will generate the last invoice.
- Make sure to download the last invoice, as you will completely lose access to invoices once you finally delete the Organization.
- Finally, complete the process by initiating the delete of the Organization again.
Organization Settings
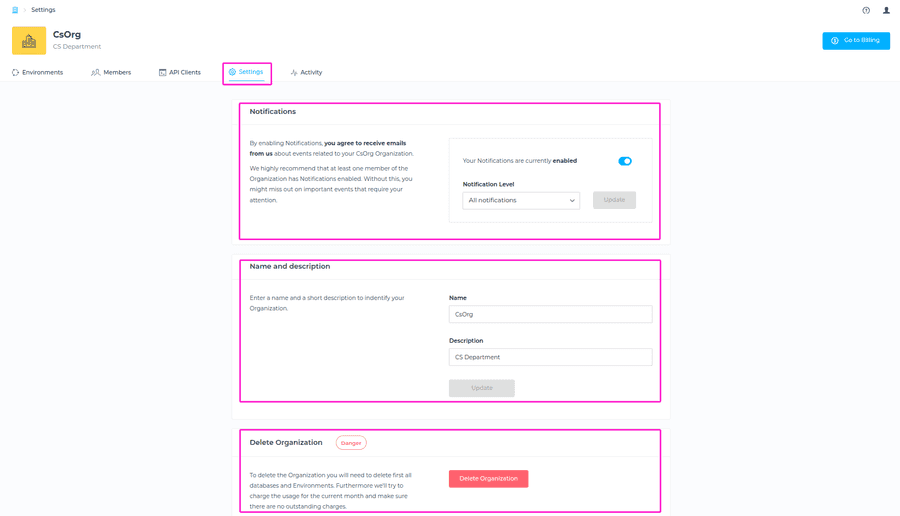
In the Organization Settings tab you can configure your Notifications, change the name and description of Organization, and delete the Organization.
Organization Activity
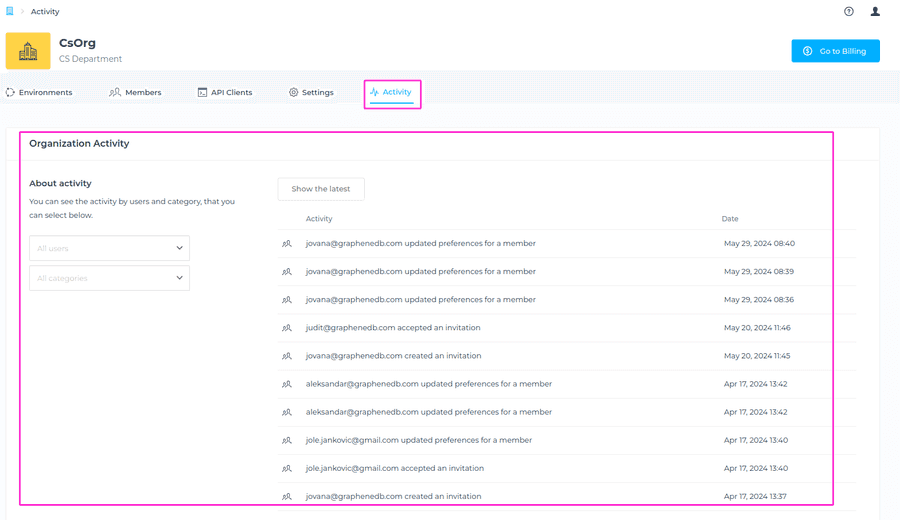
You’ll be able to see the last activities of your Organization. Activities that are shown are the ones related to the Organization, for example, adding a new member to the Organization. Activities on Environments or Deployments will be displayed in their own activity view. Navigate to the Organization view > Activity (as shown in the screenshot below). You can check the activity for all users or only a specific user, as well as sort it by Category for more specific visibility of activities.
The available Categories are:
- General
- Access
- Invoices
- Credit
- Payment
ℹ️ Info
Activities are going to be marked for expiration after 1 month.
