How Billing works
With GrapheneDB, the costs for a database plan (running or paused) and extras added to it (read-replicas and snapshots policies) are prorated by the hour. Important to know is that billing happens at the Organization level. We then charge monthly for the usage of the previous month, for the total amount for the usage of the Organization. You’ll have a clear overview of the breakdown of all the costs of the month in the Billing section.
Important to note is that in case a cost is stopped or changed anytime after the next hour starts, a full hour will get charged. You can find an example of how we bill in this section here.
The billing area can be only accessed by Owners, Admins and Billing Managers. You can find detailed info on how to access your Organization’s billing area in this section.
Support Plans
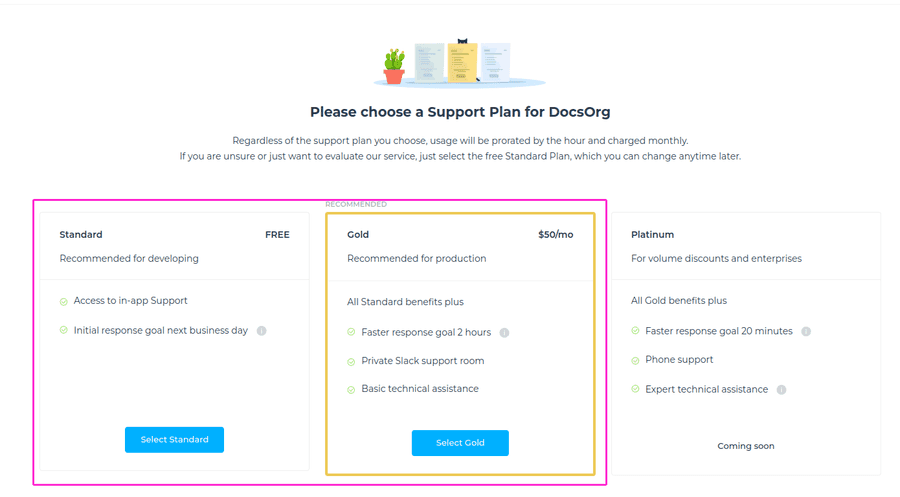
To enable you to adapt your spending to the different stages of your business, we offer different Support Plans to fit your needs. At the moment, there’s a Standard (FREE) and Gold ($50/month), and we are planning to introduce an additional Support Plan in the future. The chosen Support Plan determines the available support options for the Organization.
You can always change the Support Plan if you need, directly from the Billing > Overview > Manage Support Plan.
ℹ️ Info
Regardless of the plan you choose, usage will be prorated by the hour and charged monthly.
Choosing a Support Plan
As soon as you select a name and description for your Organization, add billing details and click on Confirm button, you’ll be prompted to the Support Plan view, where you can select the plan of your choice by clicking on the Select Standard or Select Gold button.
If you are unsure or just want to evaluate our service, just select the free Standard, which you can change anytime later.
To be able to create Environments and deploy databases, the payment method and billing details must be added. We accept credit cards as a payment method only at this moment.
Add billing details
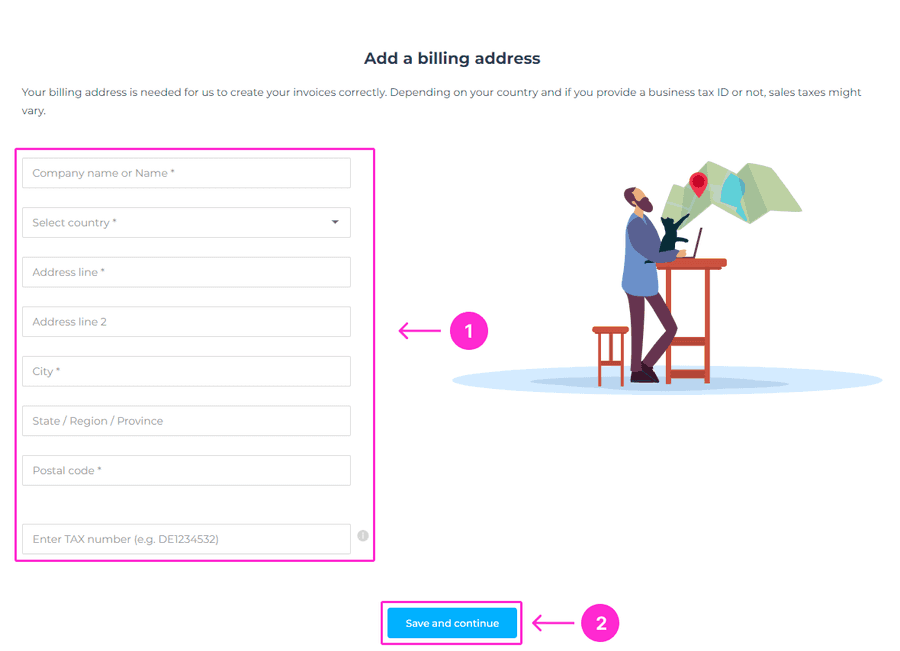
When you select the Support plan, you’ll be prompted to the next screen, where the following information needs to be added:
- Company Name or Name
- Country
- Address
- City
- State/Region/Province (optional)
- Postal code
- TAX number (please read the note below)
Professionals and companies please enter your TAX ID as proof of being a registered business.
Depending on your jurisdiction sales tax might not apply, in which case we’ll validate the information provided.
Please click on Save and Continue button to complete this step. The entered information will appear in your invoices.
Add credit card
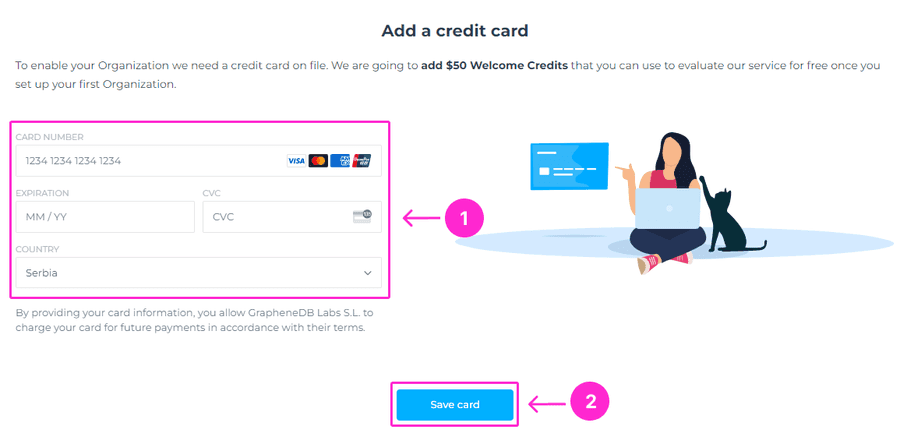
Now you’ll be prompted to the next screen, where you need to add a credit card number, expiration date, security code and country where the card was issued. We are going to add $50 Welcome Credits that you can use to evaluate our service for free once you set up your first Organization.
Once added, please click on Save card button.
Finally, you’ll be prompted to confirm your selection. There’s a full overview of the Support Plan plan you’ve selected and billing details, which you can edit if needed. Once you’re happy with the information, simply click on Confirm button.
How Support Plans work
- Every month you will get charged the Support Plan price plus your usage of the previous month.
- Usage is the calculation of all the hours of all the deployment related cost units.
- Changes in Support Plan will be charged the next billing period.
Accessing Organization’s Billing Area
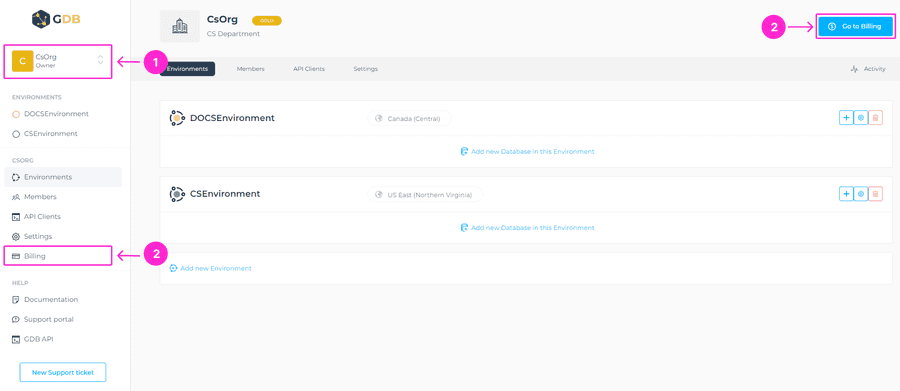
To access the Billing section of your Organization, please navigate to the Organization menu > Billing section at the lower left side, or click on Go to Billing button at the upper right corner.
⚠️ Important
Only Owners, Admins and Billing Managers have access to Billing area.
Changing Support Plan
To change your Support Plan plan, please navigate to the Billing > Overview > Manage Support Plan.
You’ll be prompted to the next screen, for the review of your selection. If you’re happy with it, please click on the Select Standard/Gold button, depending on the Support Plan plan you’ve chosen to change it to.
Changing a credit card
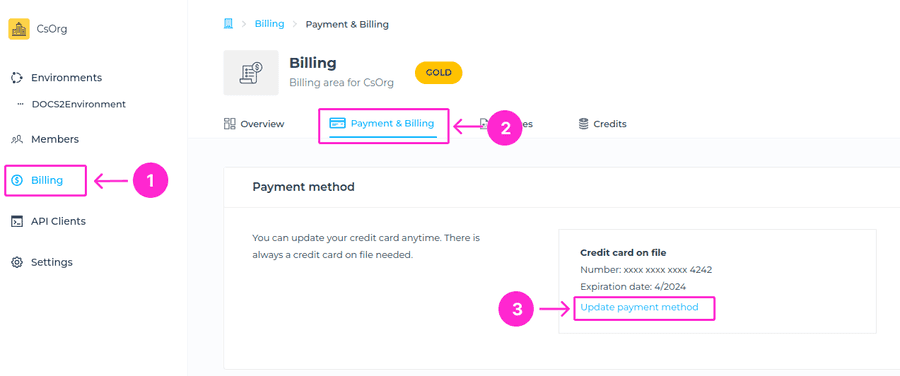
To update the credit card, navigate to the Billing section > Payment&Billing tab > Update payment method button. You’ll be prompted to enter the credit card details such as card number, expiration date, CCV number, and Country. Please click on the Save card button to complete this process.
Edit billing details
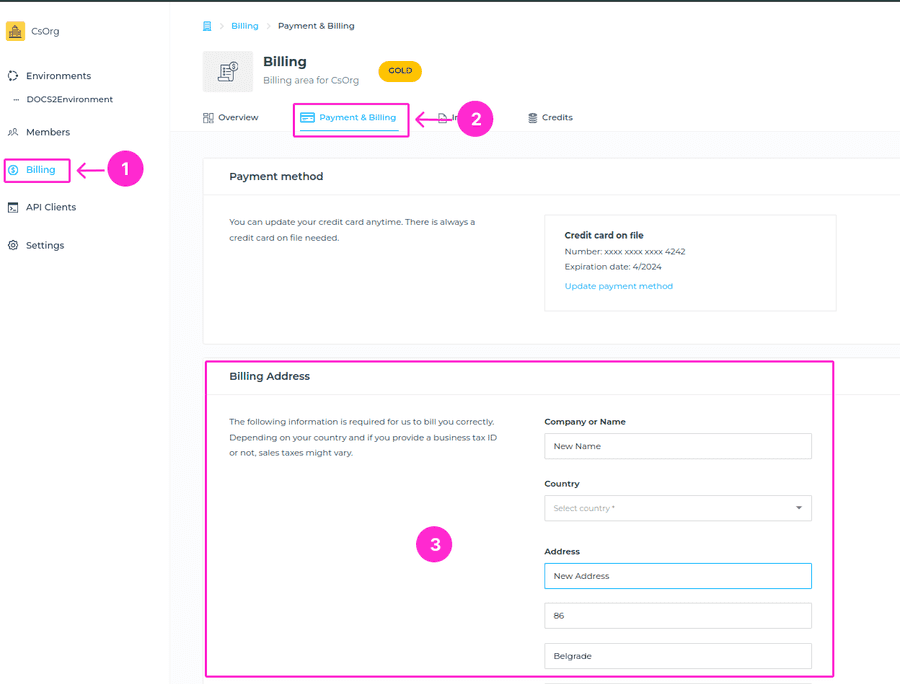
To change the billing information, such as billing address, name or TAX ID, navigate to the Billing section > Payment&Billing tab. Once edited, please make sure to click on Update details button at the bottom of the page.
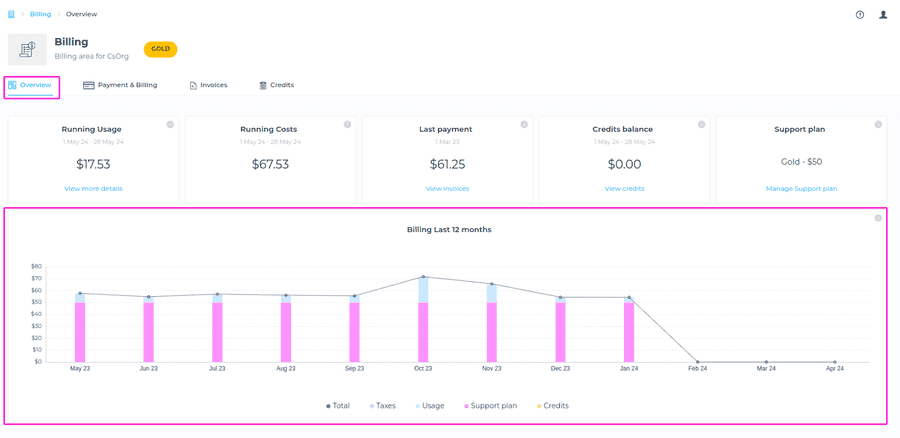
Overview of your current usage
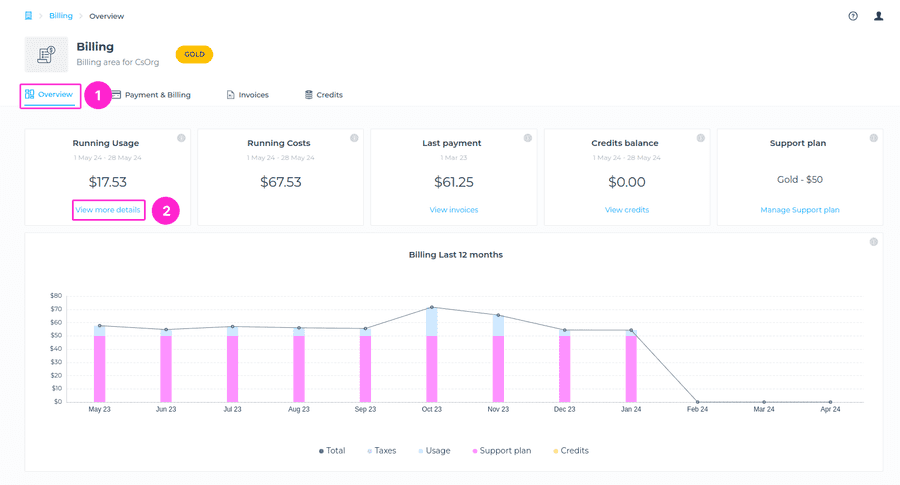
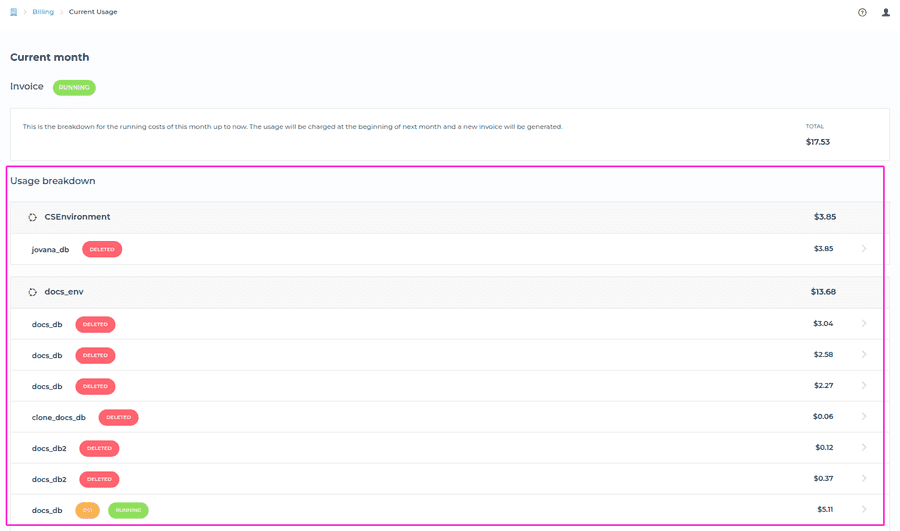
You can check at any time the breakdown of all the costs of the month in the Billing section of the desired Organization > Overview tab > Running costs > View more details button.
This shows the breakdown for the running costs of the month up to the point in time when you’re looking into it. The total usage will be charged at the beginning of next month and a new invoice will be generated.
Usage History
You’ll have a visual representation of the usage history per month for your Organization. This should help you have a clear idea of your usage trend (up or down) based on your monthly spending and you can find it in Billing section > Overview > Billing last 12 months.
Invoices
The total cost for the organization’s usage is charged at the beginning of the next month. In the Billing section, you’ll have a detailed breakdown of all expenses incurred for the month.
You can easily navigate to your invoices by selecting the Organization > Billing section from the left-hand side menu > Invoices tab. You can download all the previous invoices and also deal with payments that didn’t come through.
The invoice will have only a page with a summary of the charges, but you’ll have a clear overview of the breakdown of all the costs of the month in the Billing section.
Once the charge is successful, the invoice will get generated and a notification sent to the Owner and Billing Manager.
ℹ️ Info
Invoices will not be sent in pdf format, but you’ll be able to download them directly from your Billing management dashboard > Invoices tab.
Unsuccessful payments
In case the payment does not succeed, we will re-try to charge the credit card on file, every day for 9 days. You will also be notified about the reason behind the charging problem via email and in the Console as well, so that you can take action in a timely manner and sort this out.
After that period, in case the charge is still unsuccessful, we will stop trying to charge your card and you’ll receive a notification of pending service disruption.
Please feel free to reach out to our support team by Opening a Support Case in case you need help with payment issue.
Credits
We use credits for upfront payments for companies that want to deal only with a one-time payment. We even add some discount to it, depending on the amount.
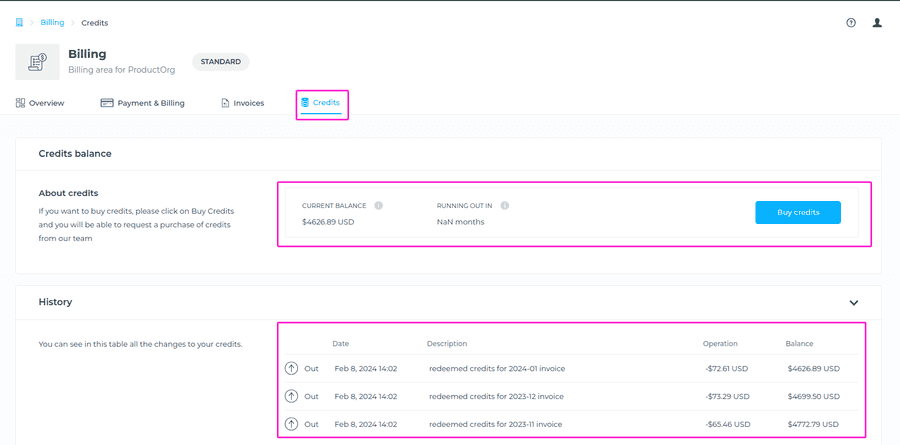
Once you buy the credits, they would be added to your account, and regardless of your deployments, every month you will be charged against the remaining credits. Credits are not conected to specific databases, they work across all deployments. You can always upgrade or downgrade your plans and your credits will still be valid. The only difference is that the estimation for how long the credits would last.
If you run out of credits we would use your credit card on file, but you can always top up your credits balance to avoid that.
To check the credit balance, please navigate to the Billing area > Credits tab.
Buying credits
We don’t support invoice billing at this time, but it is possible that you purchase the credits using a wire transfer. We send you an invoice for credits purchase, you pay via wire transfer and we add the credits to your account.
We will make it possible in the future to purchase credits directly via the GrapheneDB console, but for the time being this process is done by reaching out to our support team by Opening a Support Case.
European VAT
New EU VAT regulations that took effect on January 1st 2015 have an impact on how we may bill clients who reside in the EU. The location of the consumer is now used to calculate EU VAT, not the location of the supplier. These modifications have an impact on GrapheneDB’s users.
If an EU customer cannot demonstrate that they are a business or professional, GrapheneDB will apply the local VAT (at the customer’s domicile).
Customers from outside the EU
Customers from outside the EU do not pay VAT, although they are still required to show identification. If a consumer meets the following requirements, they are classified as a non-EU customer:
- The country where the credit card on file was issued is not in the EU
- The IP address used when submitting billing details is not in the EU
The customer will need to use a different card, try a different IP address, alter their billing address, or present an official document as evidence of residency if we are unable to identify the customer’s country of origin from either the billing information or IP address.
EU customers
VAT won’t be applied to professionals and businesses in Europe. Only consumers will be subject to the applicable local VAT (for instance, 19% for German customers and 21% for Spanish customers) according on their country of residence.
In order to validate your country of residence, any of the following criteria must match the billing address country:
- Country where credit card on file was issued
- IP address used when submitting billing details
- Country of the supplied European VAT number, provided it’s valid
The customer will be contacted and requested to re-submit their information or produce a document as verification if we are unable to authenticate the country in the billing address using any of these methods.
Only businesses can use the second and final step. No VAT will be charged if the customer is confirmed to be a business or professional. The common practice for this validation is to confirm the customer-provided European VAT number.
There is an official website which can be used to check the validity of an EU VAT number. You can find it here.
The EU VAT number can be entered in an input field for that purpose in the billing details form:
- When adding the billing details during the provisioning process or
- From the Billing section in the Organization > Payments&Billing > Update billing address
If we are unable to confirm the legitimacy of the submitted EU VAT number or if the client has not registered as an intracommunity VAT operator, extra documentation, such as legal records, may be offered.
Example of Billing
To give you even more context into our Billing logic, so that you know what to expect, here are some examples on how Billing works.
| ProdEnv | cluster prod1database | prod2database |
|---|---|---|
| Already running before the billing period | DS3 database plan Created June 10th at 18:23 | |
| Policies Extra frequency already there | Policies Extra Daily (default added) | |
| Paused on the 20th of June at 15:23 | Upgraded to DS4 June 23th at 11:24AM | |
| Resumed the 25th of June at 16:44 | ||
| Extra retention added on the 26th of June at 12:05 |
| DevEnv | dev1database | dev2database |
|---|---|---|
| Databases already running before the billing period | Databases already running before the billing period | |
| No extras | No extras | |
| Paused every day from 19:00 to 08:00AM (during the nights) and weekends (Saturday, Sunday) | Paused every day from 19:00 to 08:00AM (during the nights) and weekends (Saturday, Sunday) |
CALCULATIONS
| ProdEnv | cluster prod1database | prod2database |
|---|---|---|
| running | running | |
| Plan HA1 : 24 full days + 16 hours of the 20th + 8 hours of the 25th = 576 + 16 + 8 = 600 hours | Plan DS3: 12 full days + 6 hours of the 10th + 12 hours of the 23th= 288 + 6 + 12 = 306 | |
| Replicas: 2 x (24 full days + 16 hours of the 20th + 8 hours of the 25th) = 2 x 600 = 1200 hours | Snapshots Policy Weekly: 12 full days + 6 hours of the 10th + 12 hours of the 23th = 288 + 6 + 12 = 306 | |
| Snapshots Policy Extra Frequency: 24 full days + 16 hours of the 20th + 8 hours of the 25th =600 hours | Plan DS4: 7 full days + 13 hours of the 23th = 168 + 13 = 181 | |
| Snapshots Policy Extra Retention: 4 full days + 12 hours of the 26th = 96 hours + 12= 108 hours | Snapshots Policy Weekly: 7 full days + 13 hours of the 23th = = 168 + 13 = 181 | |
| paused | paused | |
| Plan Paused HA1: 4 full days + 9 hours of the 20th + 17 hours of the 25th = 96 + 9 + 17 = 122 hours | Plan DS3: 0 hours | |
| Snapshots Policy Extra Frequency: 4 full days + 9 hours of the 20th + 17 hours of the 25th = 122 hours | Snapshots Policy Weekly: 0 hours | |
| Replicas paused: 2 x (4 full days + 9 hours of the 20th + 17 hours of the 25th) = 2 x 122 = 244 hours | DS4 Paused: 0 hours | |
| Snapshots Policy Extra Retention: 0 hours | Snapshots Policy Weekly: 0 hours |
| DevEnv | dev1database | dev2database |
|---|---|---|
| running | running | |
| Plan DS1: No full days, 22 days from 08:00 to 18:00 = 11 hours x 22 = 242 hours | Plan DS3: No full days, 22 days from 08:00 to 18:00 = 11 hours x 22 = 242 hours | |
| paused | paused | |
| Plan DS1: 8 full days + 22 days from 18:00 to 08:00 = 15 hours x 22 + 192 hours = 522 hours | Plan DS3: 8 full days + 22 days from 18:00 to 08:00 = 15 hours x 22 + 192 hours = 522 hours |
We’re happy to address any questions you may have on this, feel free to reach out to our support by Opening a Support Case.
