


GrapheneDB currently doesn’t allow for direct import of .dump files into a GrapheneDB instance. We get many requests on migrating from Neo4j Aura for example, where .dump file needs to be imported. You have few options to approach this. You can load the dump locally using the Neo4j admin tool, or use Neo4j Desktop locally, and then import the compressed folder to your GrapheneDB instance that has the same Neo4j version.
Using Neo4j admin tool
Installing Neo4j admin tool
Firsly make sure that you have Neo4j admin tool installed. You can find official documentation around it in Neo4j docs. Please make sure that the version of Neo4j admin tool corresponds to the Neo4j version your database is using.
Creating a local Neo4j instance from .dump file
Next thing is to create a local Neo4j instance from a .dump file. Please check the example commands below to see how to achieve this.
-
Stop the Neo4j service to avoid conflicts during the restoration process.
sudo systemctl stop neo4j -
If this is not the first time you are using Neo4j admin tool, clean the existing data directory to ensure there are no conflicts with the new database.
sudo rm -rf /var/lib/neo4j/data/databases/neo4j sudo rm -rf /var/lib/neo4j/data/transactions/neo4j -
Use the neo4j-admin tool to load the .dump file. Replace
path/to/your/dumpfile.dumpwith the actual path to your dump file.sudo neo4j-admin load --from=path/to/your/dumpfile.dump --database=neo4j --forceThe
--forceflag overwrites the existing database if it exists. -
After restoring the database, start the Neo4j service.
sudo systemctl start neo4j -
Check the Neo4j logs to ensure the service started correctly and the database was restored without issues.
sudo tail -n 50 /var/log/neo4j/neo4j.log
sudo tail -n 50 /var/log/neo4j/debug.log
Locating and compressing the folder
-
First, stop the Neo4j service.
sudo systemctl stop neo4j -
Locate the
/datafolder. The/datafolder is typically located in the Neo4j installation directory. The default path is/var/lib/neo4j/data. You can confirm this by checking the Neo4j configuration file.sudo nano /etc/neo4j/neo4j.confLook for the line that specifies
dbms.directories.data. If it’s not set, the default is/var/lib/neo4j/data. -
Once you have located the
/datafolder, you can compress it using the tar command.sudo tar -czvf neo4j-data-backup.tar.gz -C /var/lib/neo4j dataThis will create a compressed file named neo4j_data_backup.tar.gz in your current directory.
Import the compressed folder into GrapheneDB instance
Now you’re all set to import the folder into your GrapheneDB instance. Locate your GrapheneDB instance, navigate to the Management Launcher, and from the drop-down menu, select Import.
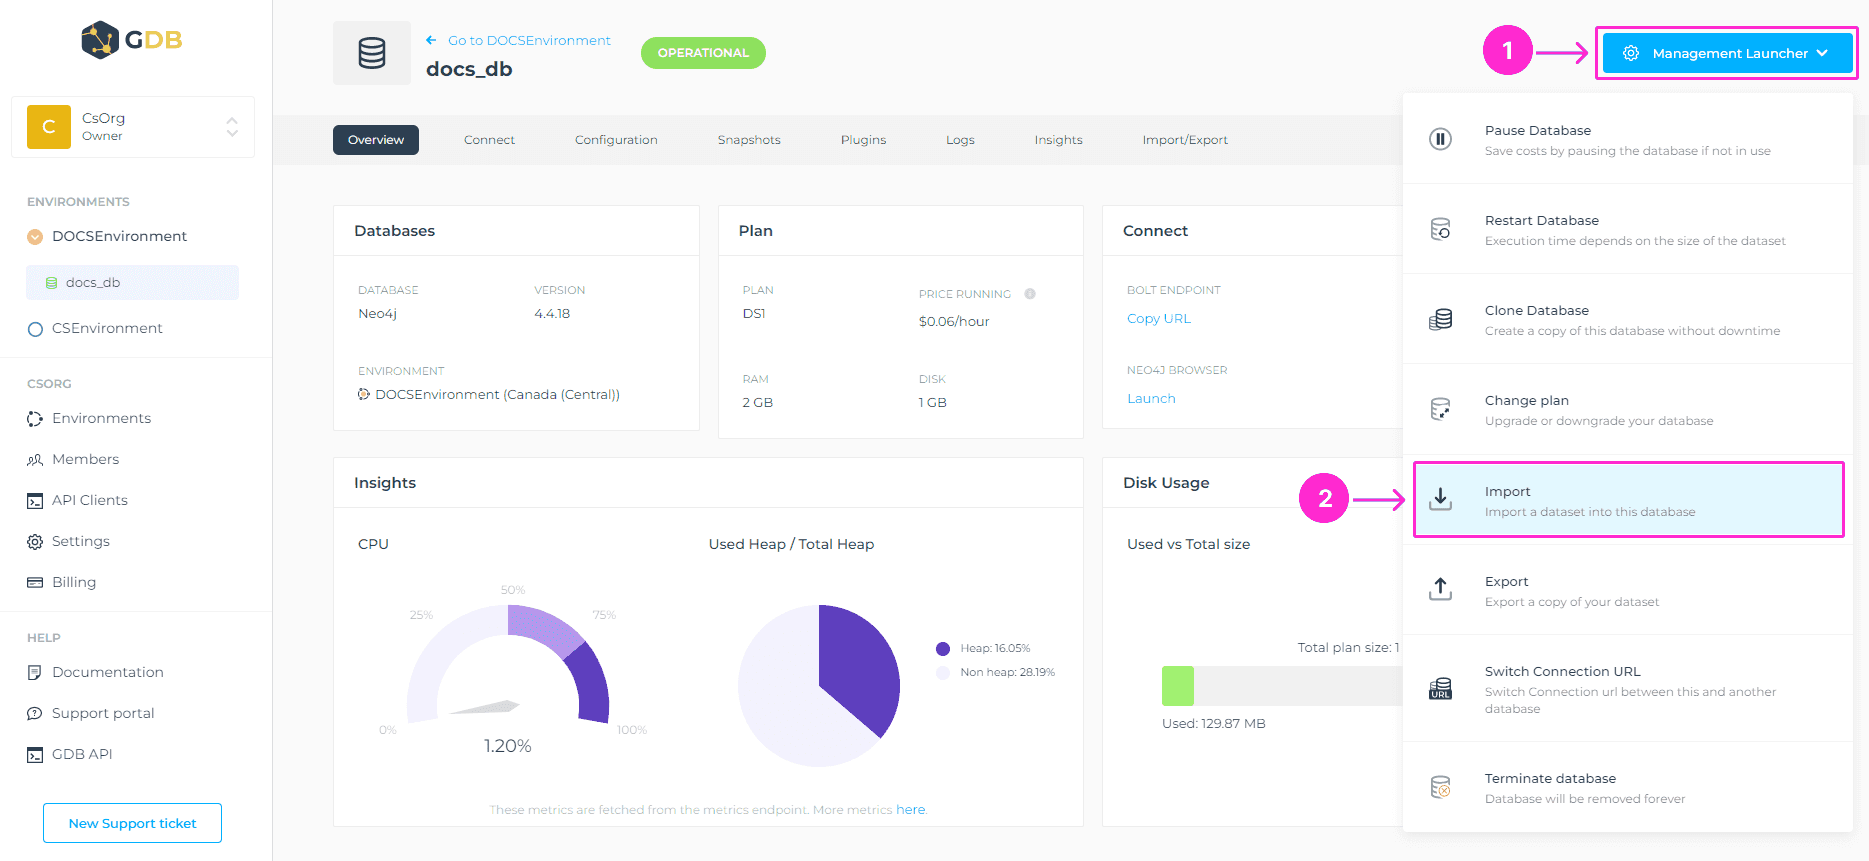
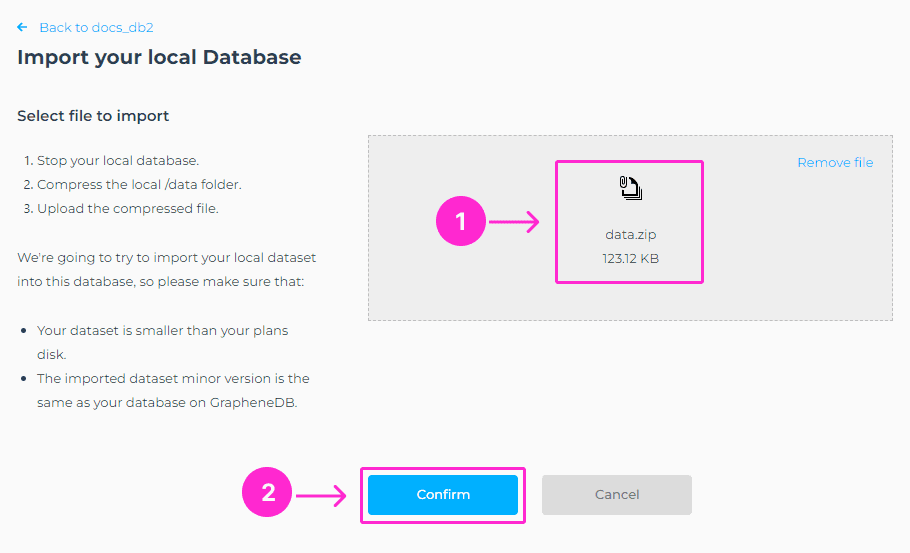
A new screen will appear, which will ask you to select a file that you want uploaded. Please select a compressed file and click on Confirm button.
⚠️ Important
- Please make sure to stop your local database before compressing the data folder.
- Compress the local /data folder.
- Make sure your dataset is smaller than your plan’s disk.
- Make sure the imported dataset minor version is the same as your database on GrapheneDB.
- The current database will be replaced with the file you select to be imported.
- Upload the compressed file.
- If the system db is present in the import file, the credentials of the system db that you had locally should work on your GrapheneDB database after the import.
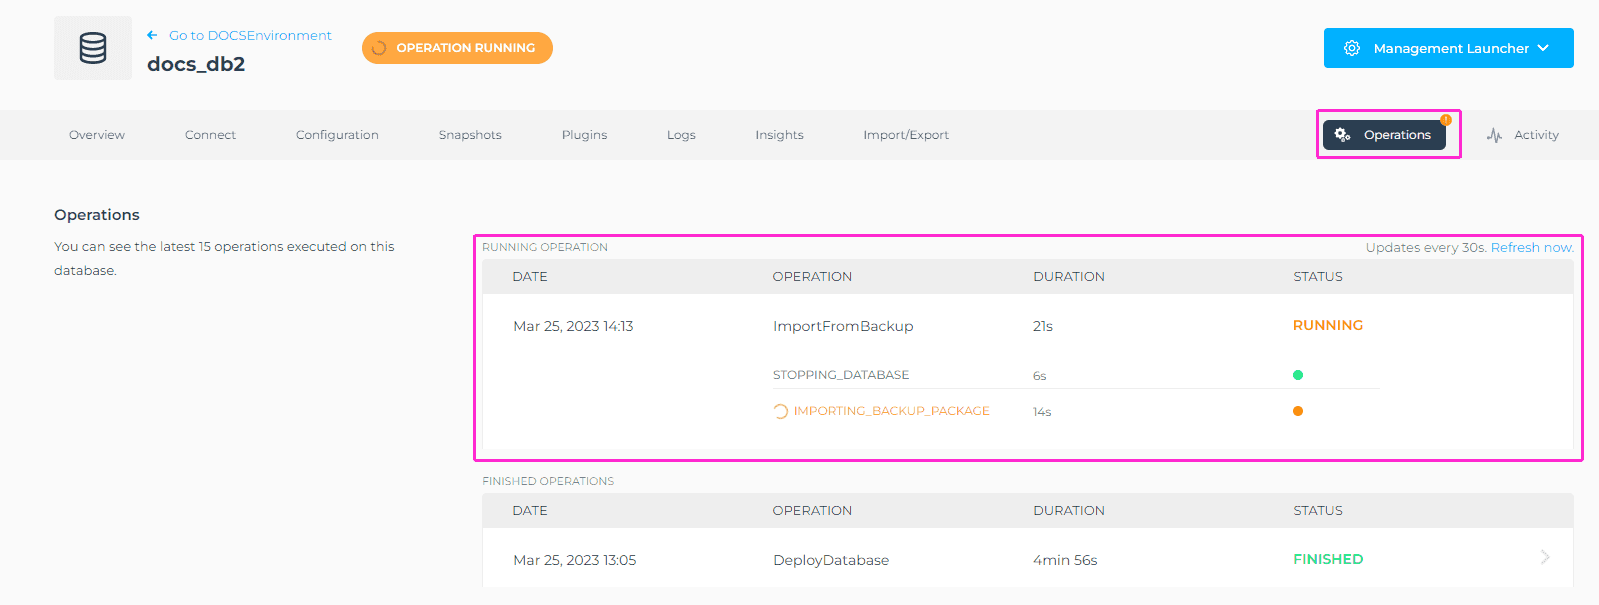
The Neo4j instance will be stopped, the store files replaced, and then Neo4j will be started up again. To track the progress of the import operation, please navigate to the Operations tab of your database interface.
Verifying the data is properly imported
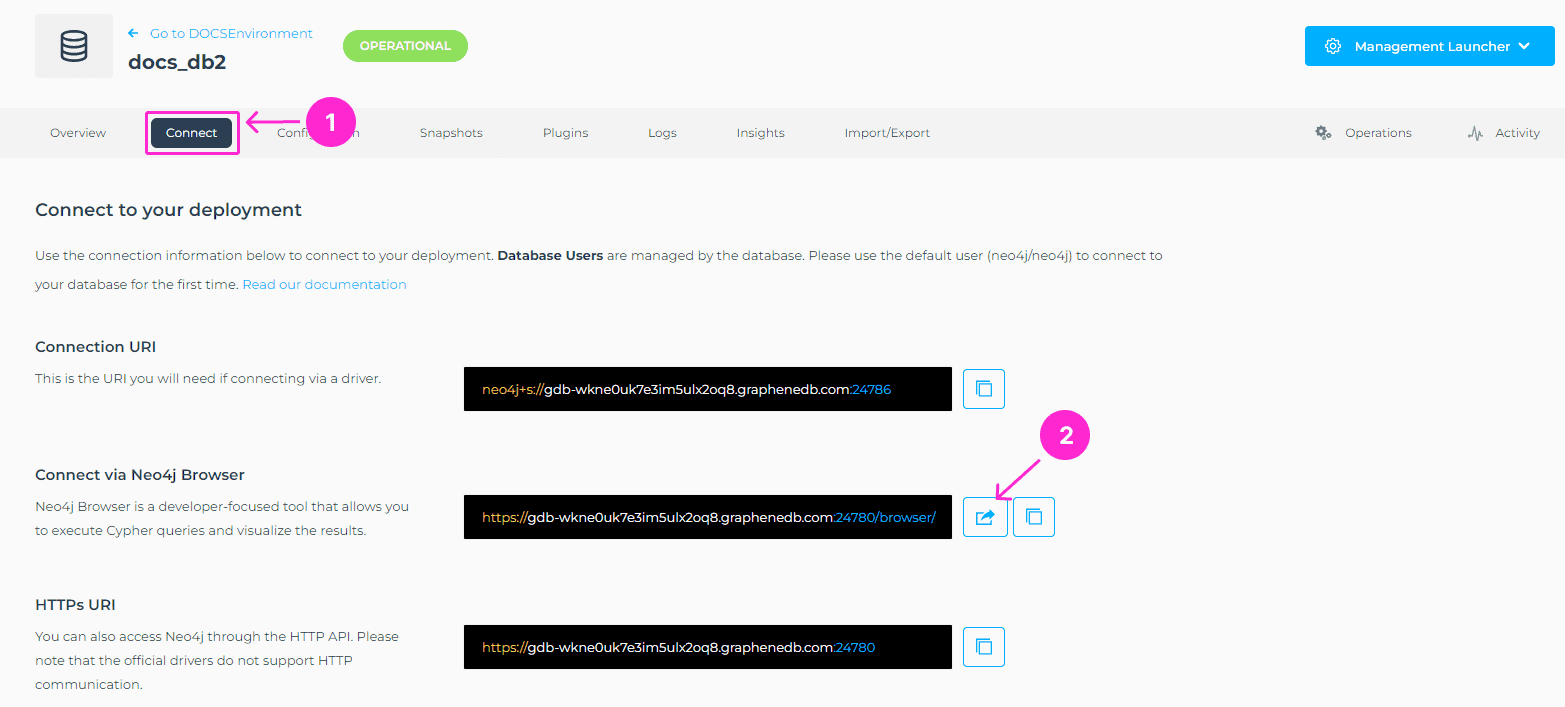
Please navigate to the Connect tab of your database interface, launch a Neo4j Browser and verify the data is there. If the system db is present in the import file, the credentials of the system db that you had locally should work on your GrapheneDB database after the import.
Using Neo4j Desktop
Installing Neo4j Desktop and creating a Project
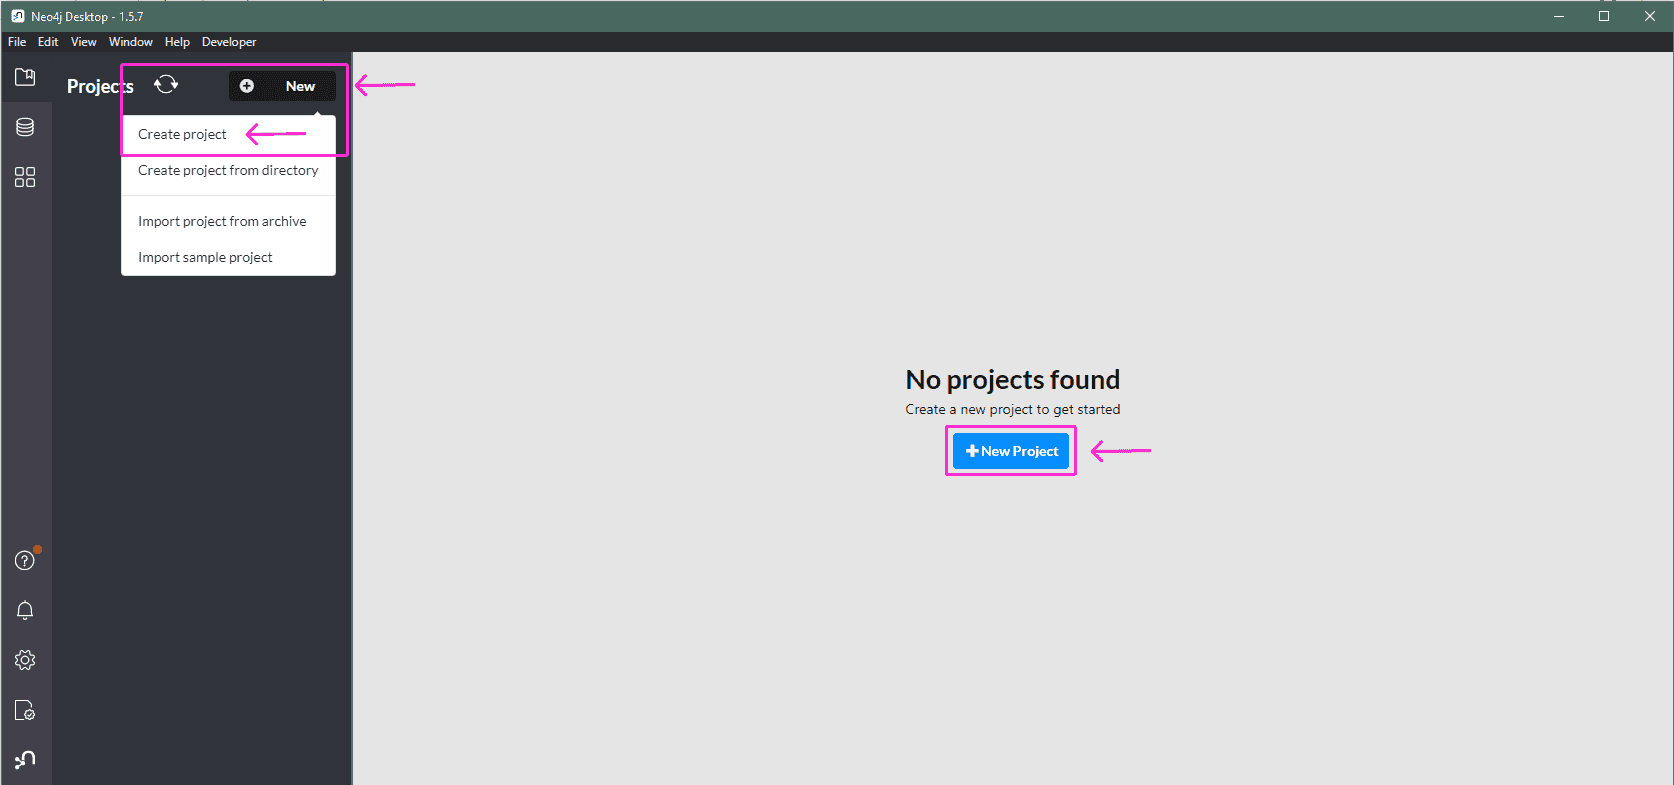
The first step is to download and install Neo4j Desktop if you haven’t already. Once successfully installed, on the Project tab, create a new Project.
Loading a dump file and creating a DBMS from it
Now, please click on +Add button > choose File from the drop-down menu, to add the dump file from Neo4j Aura.
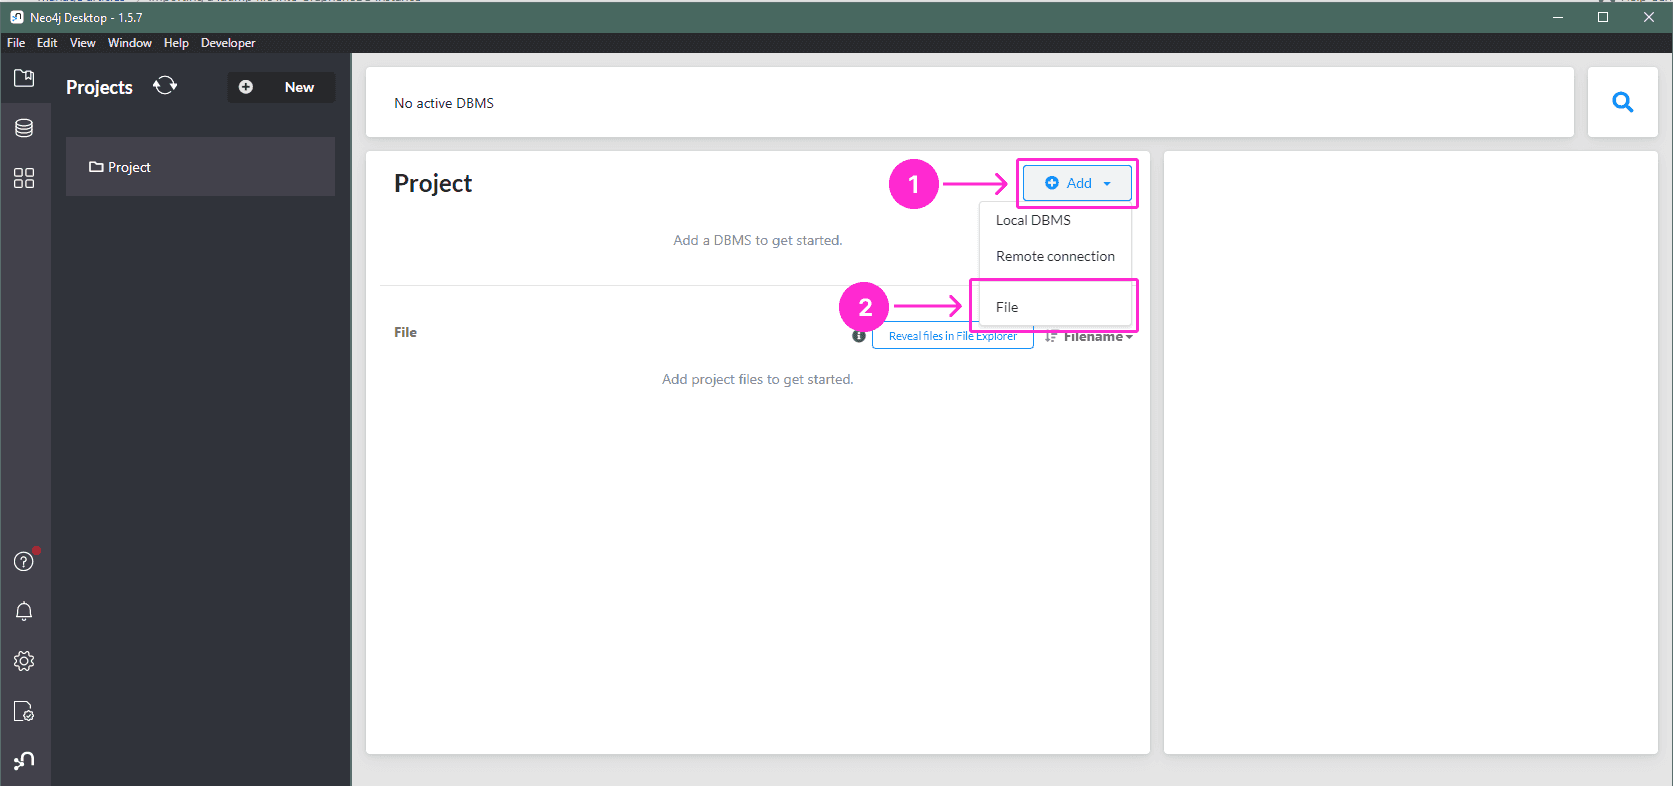
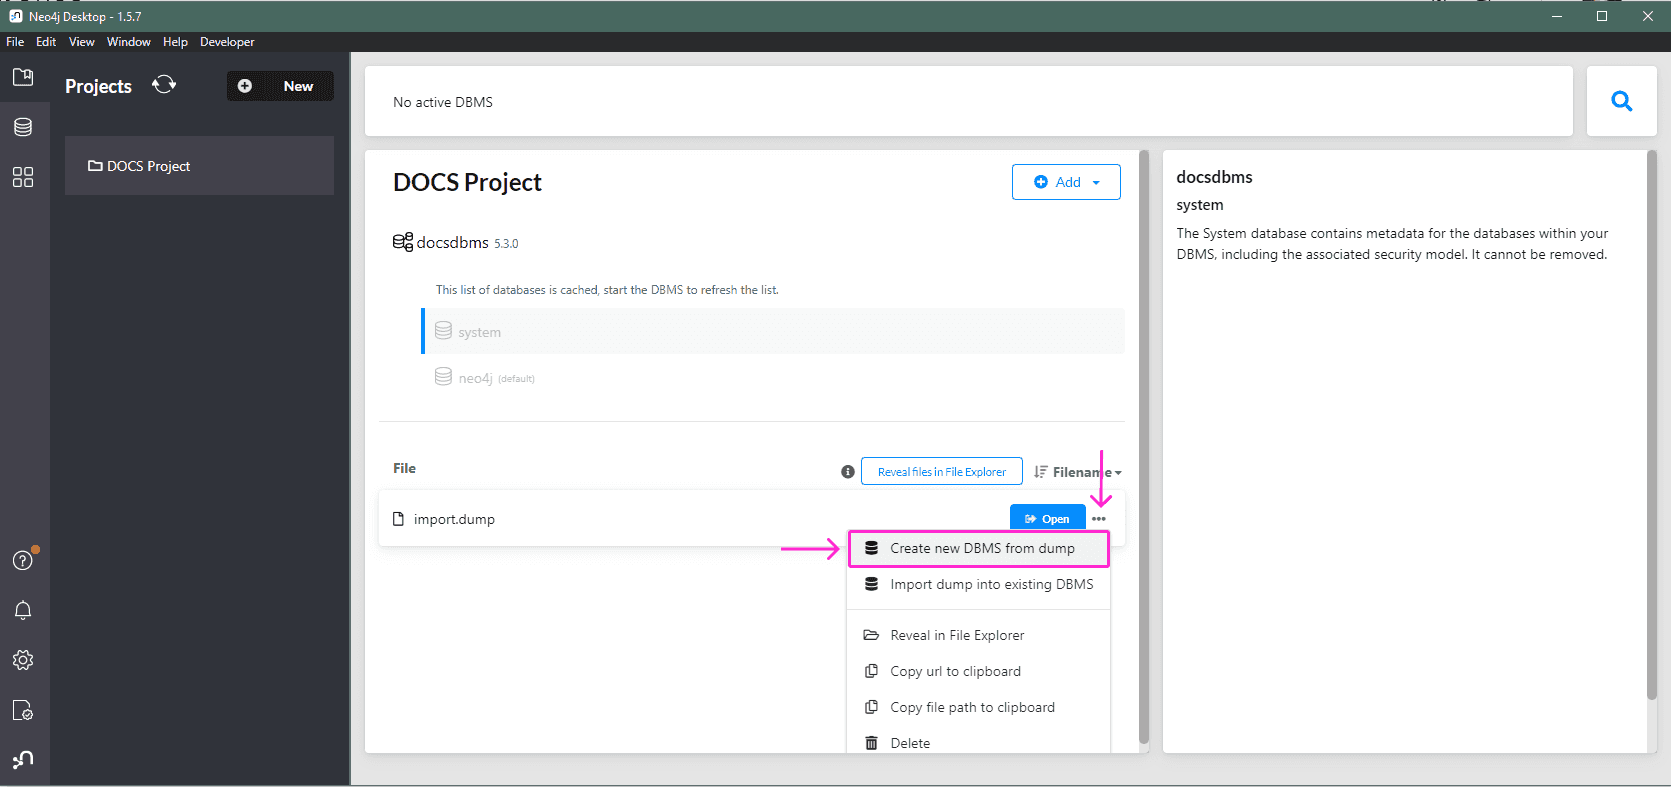
If successful, you’ll find the .dump file under the File section.
Navigate to the dump file you’ve loaded and click on the three dots on the right-hand side to open the options > select Create new DBMS from dump.
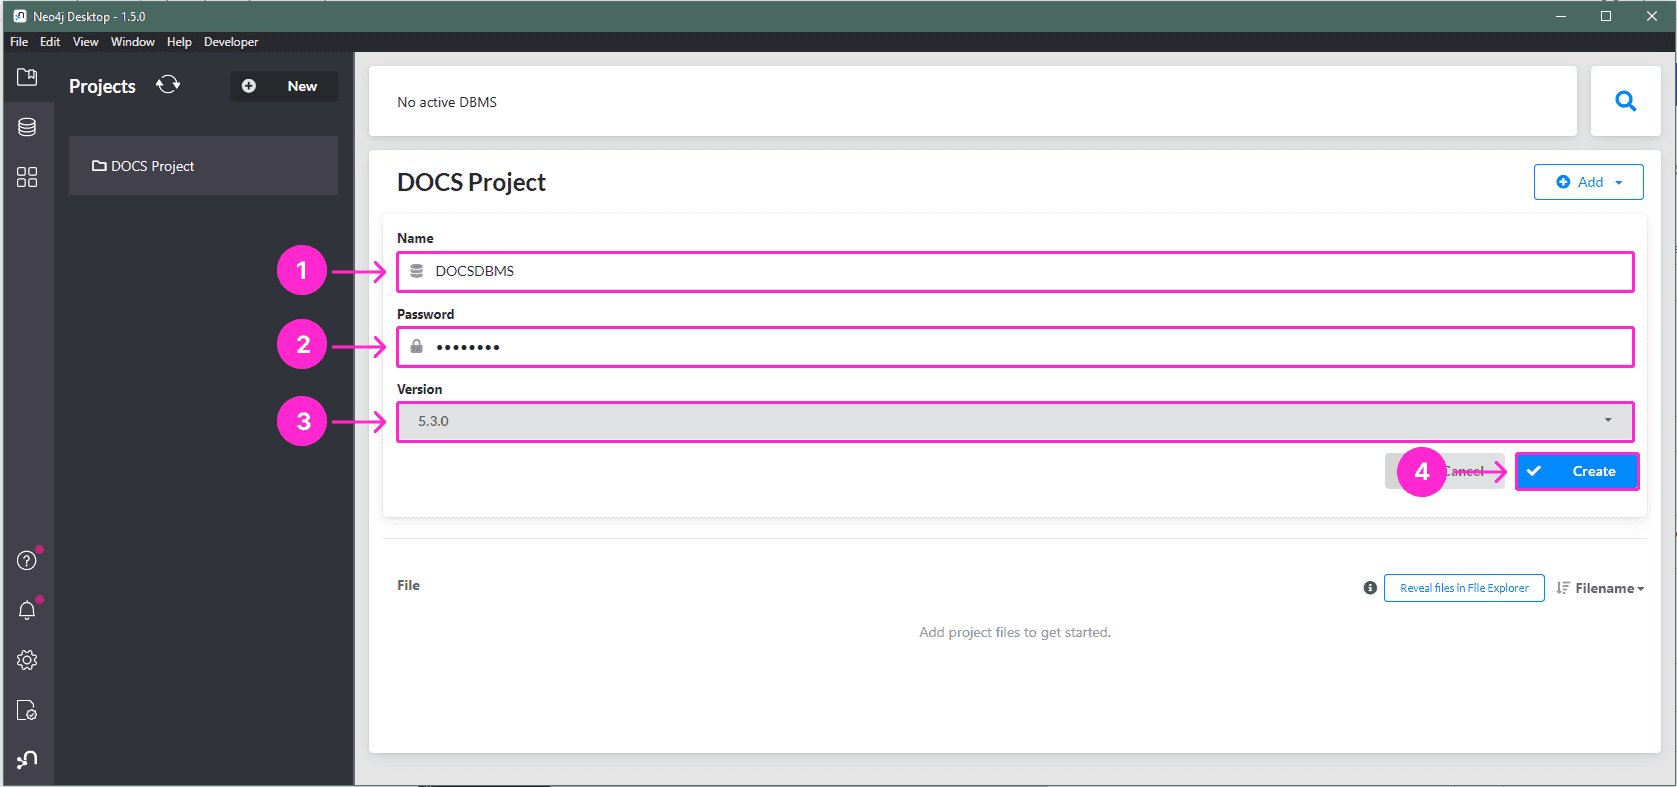
Name your database, add a password, and select your Neo4j version. Make sure your version is compatible with your .dump file. Click on Create button.
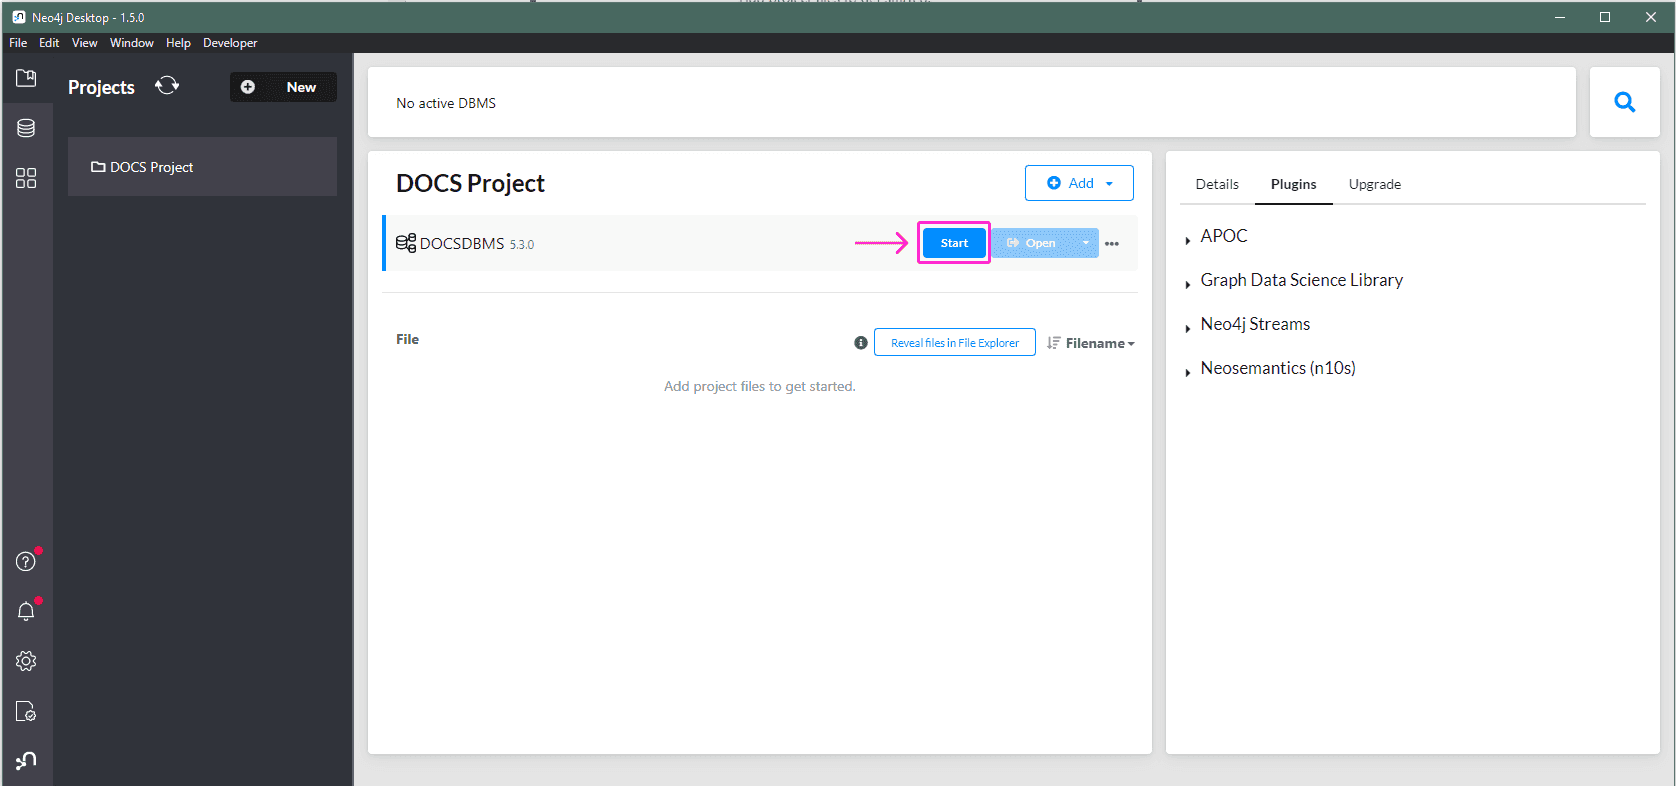
Once it’s created, select your DBMS and you’ll see the Start button. Click on it.
When the database is started, it populates both system and default(neo4j) databases, and you can open the Neo4j Browser by navigating to Open button, to check the contents of the new database, neo4j database should contain the data from the dump file.
Locating and compressing the folder
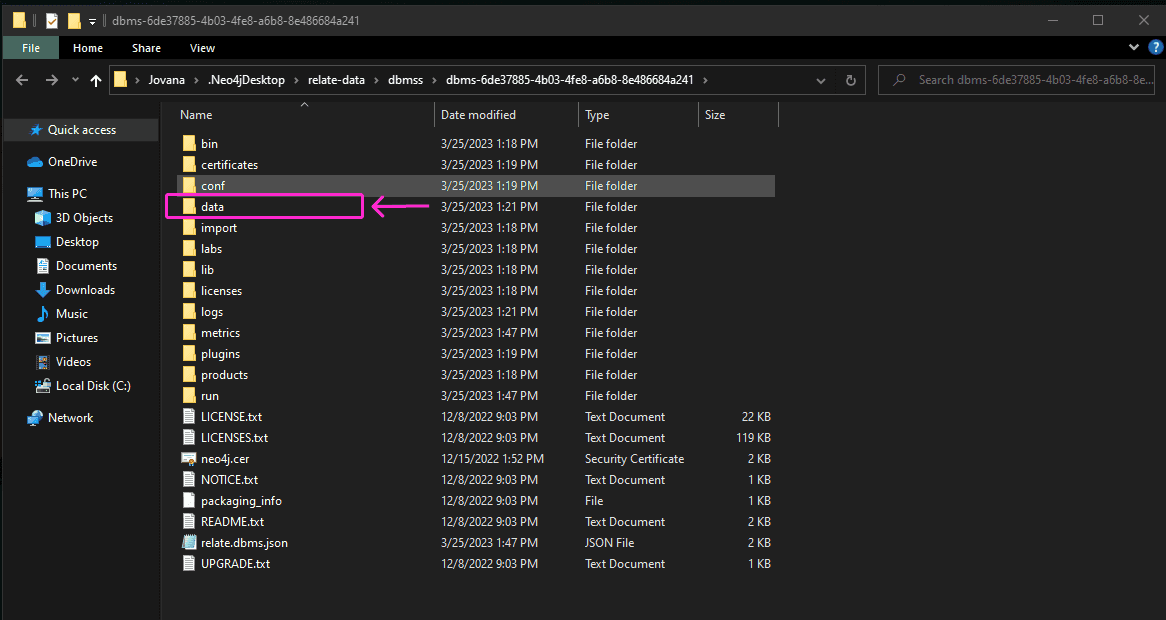
Now, please Stop the local database and locate the folder where this new instance is stored. Click on the three dots next to your DBMS > Open folder > DBMS.

That opens the data folder location.
You can copy the data folder to a more convenient location like a Desktop, then compress the file to any of the accepted formats for importing into GrapheneDB. Supported formats are: zip, tar, cpio, gz, bz2 and xz.
Import the compressed folder into GrapheneDB instance
Now you’re all set to import the folder into your GrapheneDB instance. Locate your GrapheneDB instance, navigate to the Management Launcher, and from the drop-down menu, select Import.
A new screen will appear, which will ask you to select a file that you want uploaded. Please select a compressed file and click on Confirm button.
⚠️ Important
- Please make sure to stop your local database before compressing the data folder.
- Compress the local /data folder.
- Make sure your dataset is smaller than your plan’s disk.
- Make sure the imported dataset minor version is the same as your database on GrapheneDB.
- The current database will be replaced with the file you select to be imported.
- Upload the compressed file.
- If the system db is present in the import file, the credentials of the system db that you had locally should work on your GrapheneDB database after the import.
The Neo4j instance will be stopped, the store files replaced, and then Neo4j will be started up again. To track the progress of the import operation, please navigate to the Operations tab of your database interface.
Verifying the data is properly imported
Please navigate to the Connect tab of your database interface, launch a Neo4j Browser and verify the data is there. If the system db is present in the import file, the credentials of the system db that you had locally should work on your GrapheneDB database after the import.