Snapshots
With the Snapshots feature, we are introducing policies to offer better frequency and retention. GrapheneDB Snapshots provide localized backup storage using the native snapshot functionality of AWS. You’ll be able to disable snapshots completely if you want. Snapshots are created in AWS, aren’t possible to be downloaded, and can only be used inside GrapheneDB.
There are two main options that you can choose from:
- On-demand Snapshots
- Scheduled Snapshots (Daily, Weekly, Monthly, Extra Retention, and Extra Frequency plans).
On-demand Snapshots
You’ll be able to create a point-in-time recovery with a Snapshot before executing an operation in the database or making some changes, instead of waiting for the Scheduled Snapshot to be there. This is very useful for performing potential breaking changes, for example.
ℹ️ Info
You can create up to 2 free On-demand Snapshots. For more, please use Scheduled Snapshots. Alternatively, you can delete one of the existing ones and create a new one.
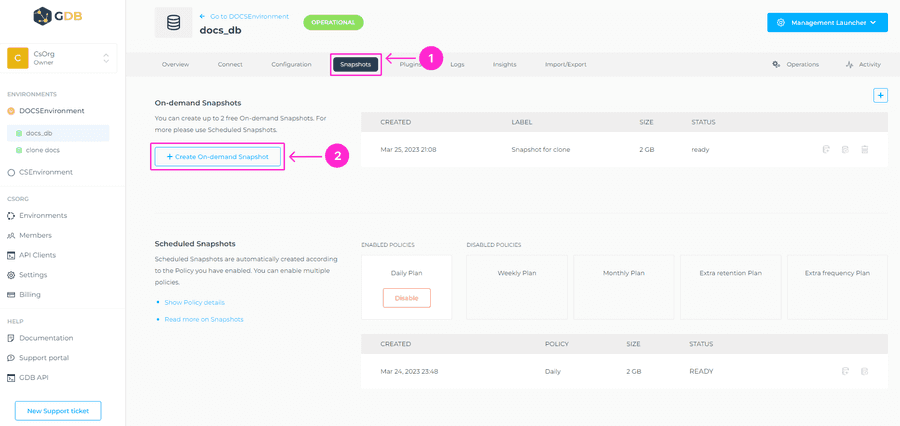
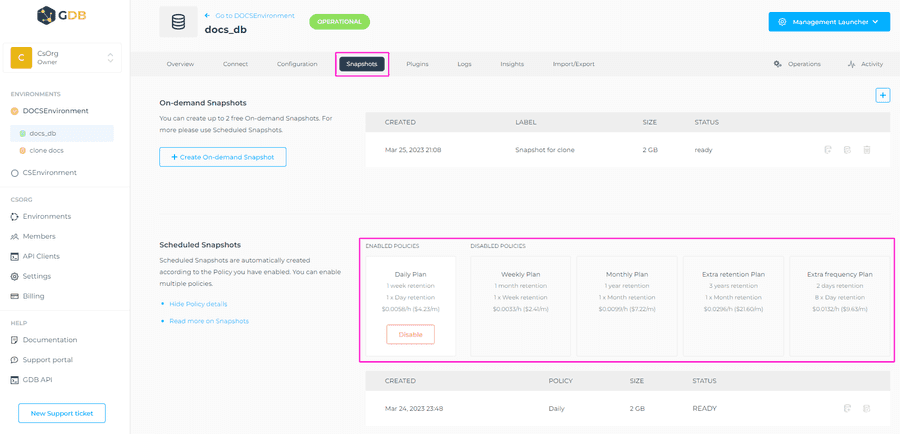
To create an On-demand snapshot, navigate to the Snapshots tab of your database > + Create On-demand snapshot button. You’ll be prompted to the next screen, where you can identify the Snapshot with a label. This field is not mandatory and will be autocompleted with a default if left empty. To create it, click on the Create button.
You’ll be able to see the progress of this operation, in the Operations tab of your database. The On-demand Snapshot will have a Ready status once available.
Once the On-demand snapshot is created, you’ll be able to:
- Create a new Database from it.
- Restore into the same Database.
- Restore into the existing Database.
- Delete it.
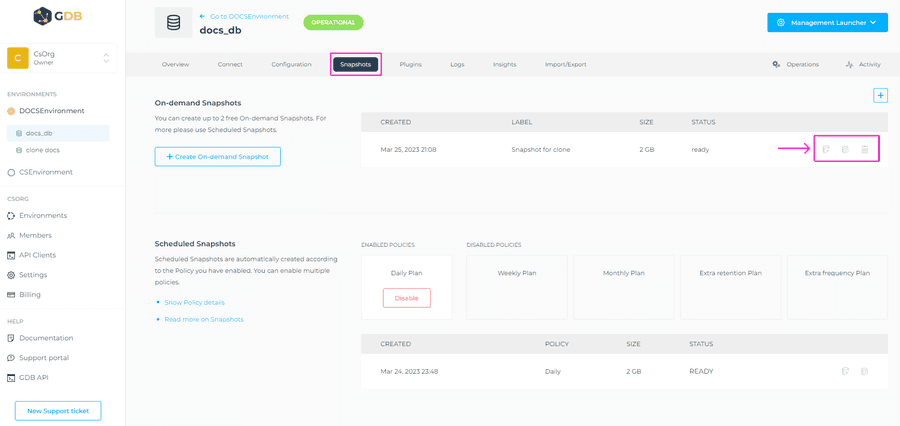
To choose from these options, navigate to the right side of the On-demand snapshots section, and click on the respective button.
Delete On-Demand Snapshot
To delete the On-Demand Snapshot, navigate to the right-hand side of the Snapshot, and select the Delete snapshot icon. You’ll be prompted to the modal window, where you need to click the Confirm button to complete this action.
Scheduled Snapshots
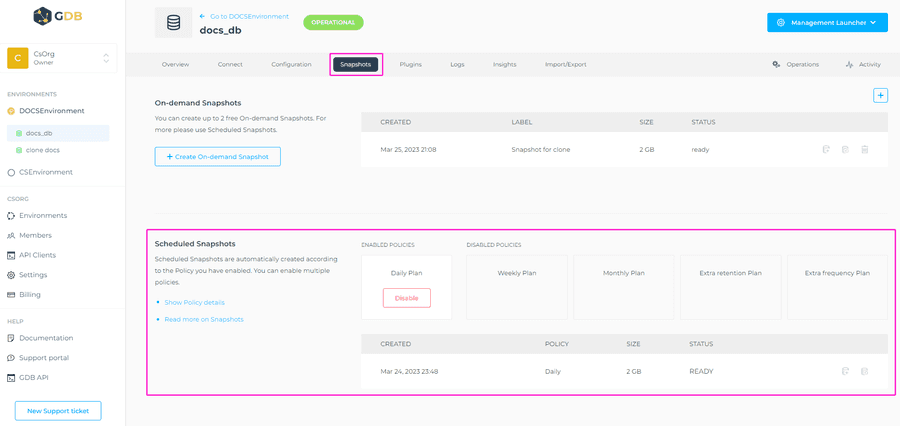
Scheduled Snapshots are automatically created following our Snapshot Policies. Once the Snapshot is created you’ll be able to:
Scheduled Snapshots cannot be deleted and will disappear from the Console when expired following the expiration date depending on the Policy.
To select the Snapshot Policy of your choice, navigate to the Snapshots tab of your database > Scheduled Snapshots section. Click on Enable button of the policy you choose, and you’ll have an overview of the price for that Policy before you click on the Confirm button to enable it.
Snapshot policies
Snapshot Policies allow you to choose the frequency and retention for the Snapshots of your databases. There are 5 different policies to choose from: Daily, Weekly, Monthly, Extra Retention and Extra Frequency and they are prorated by the hour.
Important to know is that policies can be combined (Daily Policy and the Extra Retention Policy as an example). Policies can also be removed.
| Policy | Frequency | Retention | Number of snapshots max simultaneously |
|---|---|---|---|
| Daily | Every day | 1 week | 7 |
| Weekly | Every Saturday | 1 month | 4 |
| Monthly | Last day of the month | 1 year | 12 |
| Extra Retention | Last day of the month | 3 years | 36 |
| Extra Frequency | Every 3 hours | 2 days | 16 |
Charging of Snapshot policies - how does it work?
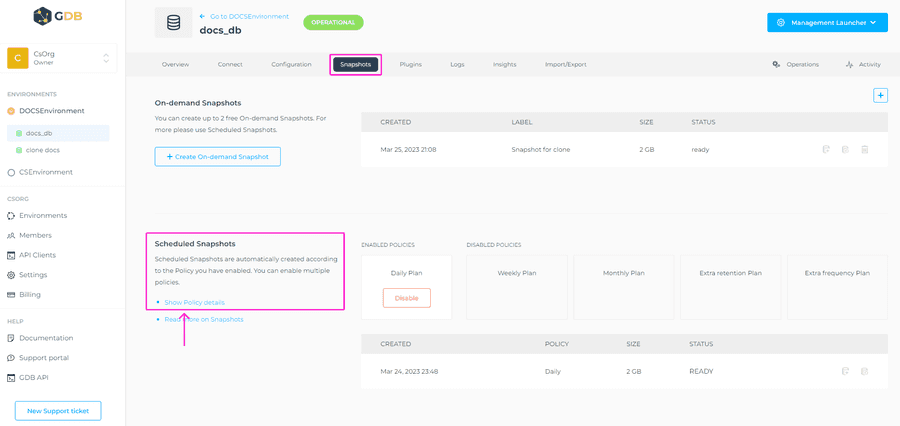
Snapshot policies will get charged as Extras prorated to the hour for the time that Policy is enabled during a month. Prices of Snapshot policies can be seen in the Snapshot view > Scheduled Snapshots section > Show policy details.
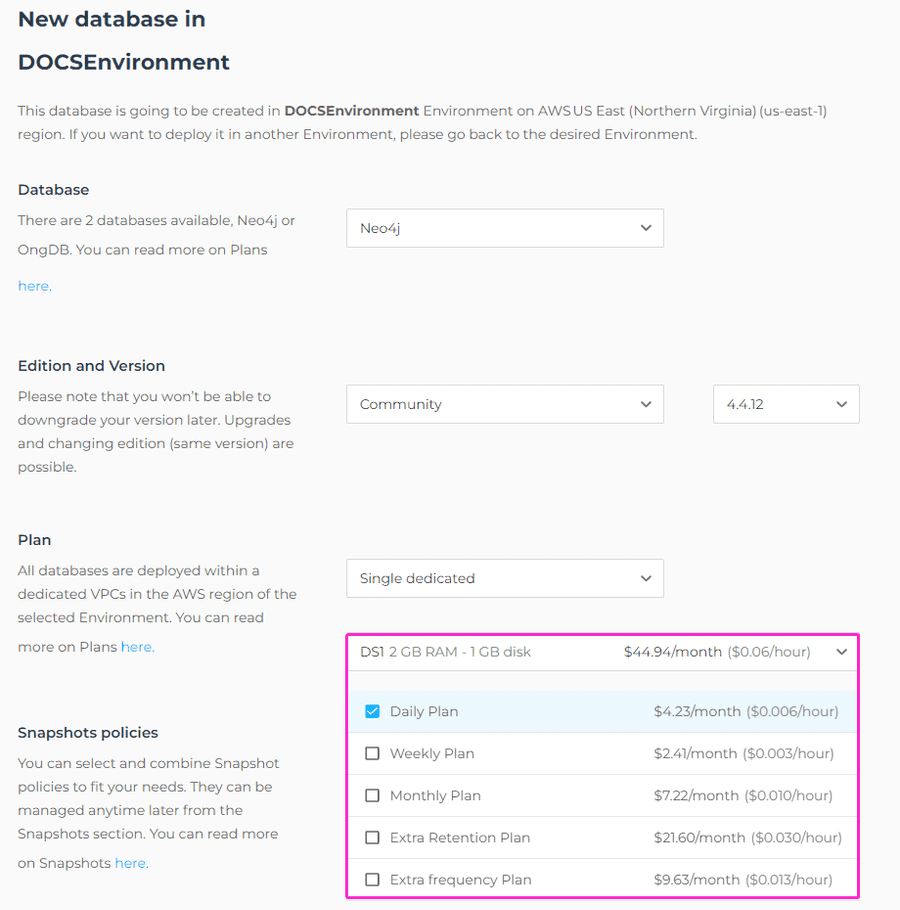
Additionally, during the creation of the database, when selecting the Snapshot policy, price of each policy will be displayed for your reference.
Pricing is connected to the policy and the plan, and it’s hourly.
Let’s take an example of a DS4 plan, the daily policy price is 0.0422/hour. When it comes to monthly price, we have done an estimation, because it depends on the month, but if we take 730 hours as a median, the price for that particular policy for that particular plan would do $30.806 for a month, not per Snapshot.
For other plans or other policies pricing is different, and you can find more details about it here.
Disable snapshot policies
Please navigate to the Snapshots section of your database management dashboard, and click the Disable button of the respective policy you want disabled.
The modal window will show, to inform you that you’re about to disable the policy. Please click on Confirm button to complete this action.
⚠️ Important
When removing a snapshot policy no snapshot will get deleted. What will happen is that snapshots will no longer be created that are under that specific policy.
Restore Snapshot into Database
Scheduled or On-demand Snapshots can be restored into any database within the Organization.
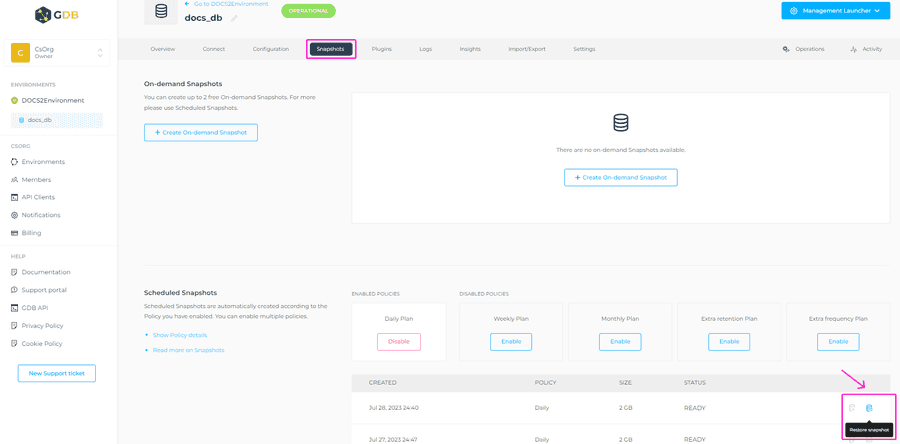
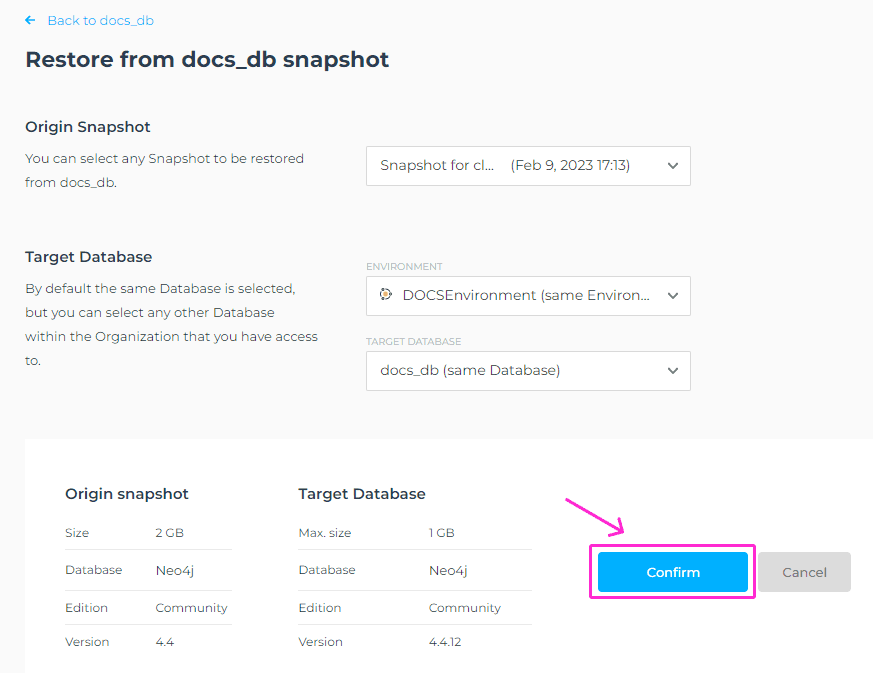
Navigate to the Restore Snapshot icon on the right-hand side of a specific Snapshot, you’ll be led to the Restore Snapshot view, where:
- You can select the Snapshot (if there are multiple).
- You can select the Environment.
- You can select the Database that will get restored with the Snapshot.
Important to know is that by default the same Database is selected, but you can select any other Database within the Organization that you have access to.
The target Database needs to meet the following criteria:
- Same major and minor database version (patch version can differ)
- Same plan or higher as Origin Database (from where Snapshot was taken)
- Same edition and vendor as the Origin Database.
Otherwise the operation will fail before starting.
To initiate the restore operation, click on Confirm button.
⚠️ Important
The operation will result in downtime in the Target Database, but not in the Origin Database where the Snapshot was taken from. The operation time will depend on the size of the Snapshot.
You’ll be able to see the progress of this operation in the Operations tab of your database.
Create new Database from Snapshot
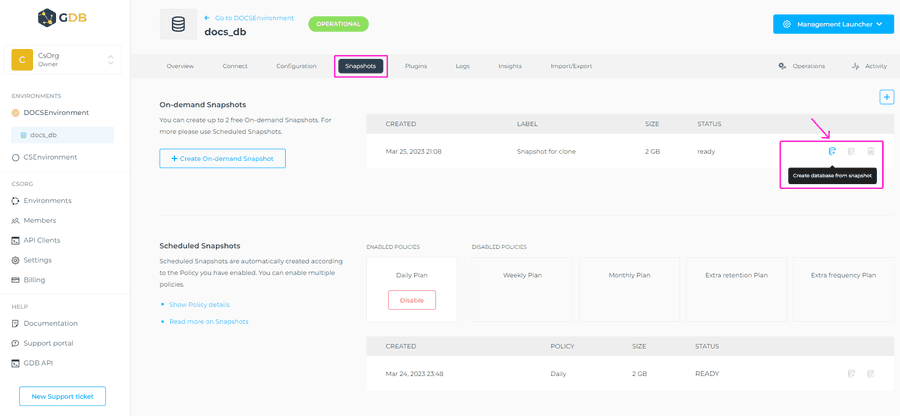
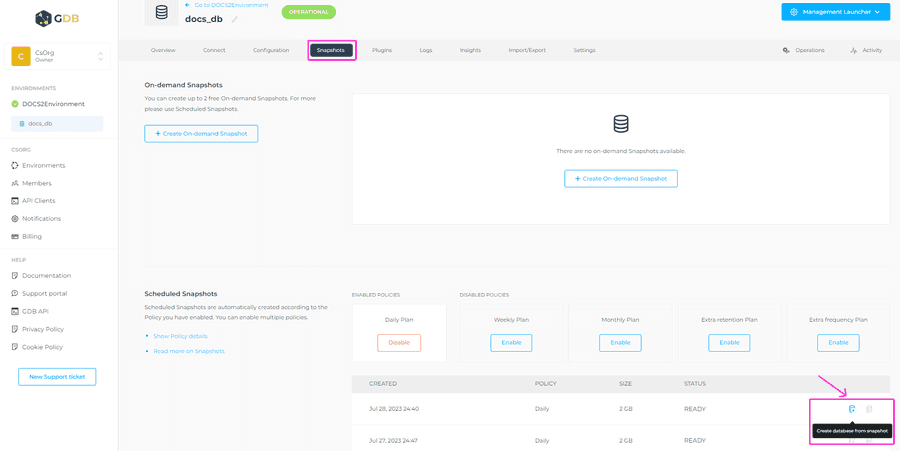
You can also create a new database from the chosen Snapshot, and to initiate this operation, navigate to the Create database from snapshot icon on the right-hand side of the chosen Snapshot.
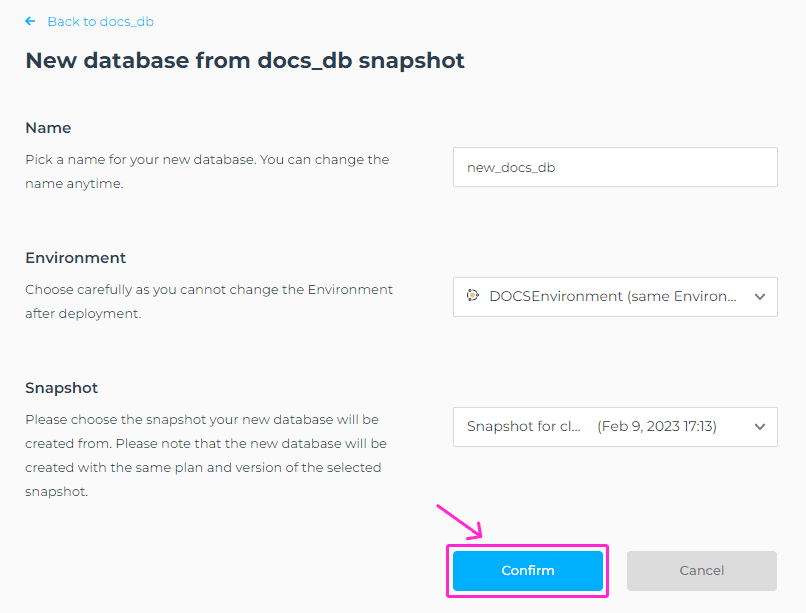
You’ll be prompted to the next screen, where you’ll be able to select:
- Name of the new database
- Environment (from a list of environments that the user has access to) - choose carefully, as you cannot change the Environment after deployment.
- A different snapshot if available.
You’ll be able to see the progress of this operation in the Operations tab of your database.
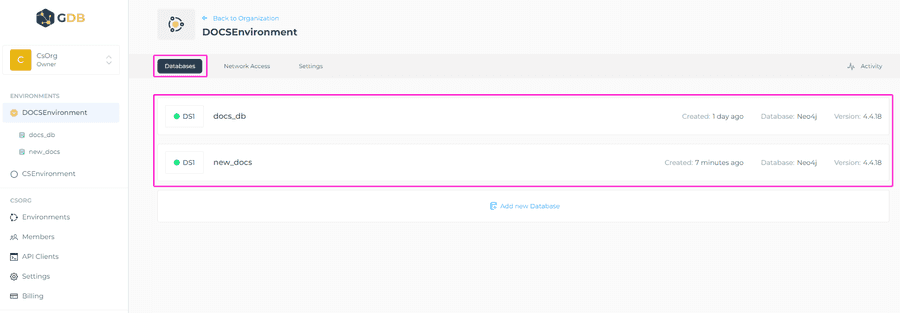
When everything is ready, you’ll see the newly created database in the list of the databases of the Environment you chose, with the Operational status.
⚠️ Important
This is not a clone, the new database won’t inherit the configuration or plugins from the origin database from where the snapshot was created. The new database will inherit the plan, version, and edition from the origin database.
